
User manual


Preventive Maintenance
ProMaster 2500 User Manual 5-33
•
Tests 1 and 2, and 11 through 14
—Trigger these optics by blocking
them with an opaque object.
•
Tests 3 and 4
—Push straight down on the beam head to perform
these two tests.
•
Tests 15 and 16
—Lift the main plate and slowly turn the input and
output orbital motors in one direction to trigger these optics.
•
Test 17
—Push the beam slowly to your right. As it gets close to the
end of its travel, the optic is triggered.
•
Test 18
—Remove the label liner from in front of this optic.
•
Tests 19 through 21
—These optics check the operation of the
microswitches on the three tube holders. Insert a tube in each to test
the switches.
•
Tests 22 and 23
—Press
C
to toggle the programming module clamps.
•
Test 24
—Lift the hood.
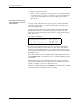
Figure 5-12
Optic and Microswitch Locations
1939-1
1
15 (Under main plate)
2
17
3
4
13
14
20 (Output tube 1)
21 (Output tube 2)
19
11
12
16 (Under main plate)
22
23