
User manual


Operation
ProMaster 2500 User Manual 4-17
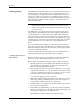
Replacing a Chuck Tip
Remove the chuck from the beam and remove the old tip. The new tip
should extend slightly beyond the metal end of the chuck so an airtight
seal can be made. After it is on, lightly chalk the end of the tip before
processing devices. Chalking decreases the possibility of a device sticking
to the tip due to an accumulation of oils from being handled.
Adjusting High and
Low Air Pressure
Your external factory air input to the 2500 should be set so that it supplies
a constant 1.0 CFM at 80 PSI.
Note: To avoid unnecessary problems, be sure to provide the 2500 with a clean,
dry, externally filtered (10 micron) air supply.
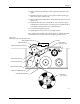
Adjust the high air pressure gauge on the 2500 to 75 PSI. When the
adjustment is correct, push the adjustment knob in toward the back of the
2500 to lock its position.
Set the low air pressure knob so that the gauge reads 30 PSI. It is normal
for this setting to fluctuate during operation, but it should not drop below
30 PSI or exceed 50 PSI. Make your final adjustments to the low pressure
setting after watching its fluctuation while the 2500 is processing devices.
See Figure 4-14. When the adjustment is correct, push the adjustment
knob in toward the back of the 2500 to lock its position.
Note: The ProMaster 2500’s high and low air pressure varies during operation;
this is normal and is not the symptom of a problem.
Figure 4-14
Adjusting High and Low Air Pressure
LOW PRESSURE
20-50 PSI
HIGH PRESSURE
65-85 PSI
A
J
S
SHIFT
B
K
T
DEL
C
L
U
D
M
V
E
N
W
F
O
X
SHIFT
G
P
Y
H
Q
Z
I
R
ENTER
1
4
7
2
5
8
3
6
9
0
LOWER
CASE
RESET
STOP
CAL
START
ON
1764-4
HIGH PRESSURE
ADJUSTMENT KNOB
LOW PRESSURE
ADJUSTMENT KNOB