
User's Guide
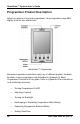
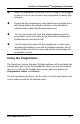
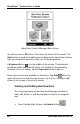
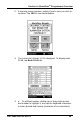
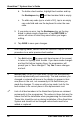
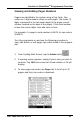
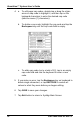
Table Of Contents
- _
- Using this Guide
- Procedures
- Warnings
- Cautions
- Notes
- For More Information
- Safety Information
- System Warnings
- Section 1: AlarmView™ System Overview
- Introduction
- AlarmView™ Transmitter
- AlarmView™ Pager
- AlarmView™ Programmer
- Section 2: AlarmView™ Transmitter Overview
- Transmitter Product Description
- Top Panel
- Antenna Connector
- On/Off Button
- Front Panel
- AC Indicator
- Transmitting Indicator
- Communications Indicator
- Infrared Port
- Rear Panel
- Monitor Input Port
- Power Input Port
- Using the Transmitter
- Transmitter Placement
- Turning Transmitter On
- Turning Transmitter Off
- Operating Transmitter On Battery Power
- Testing System Setup
- Send Test Page
- Section 3: AlarmView™ Pager Overview
- Pager Product Description
- Alarm Pages
- Alarm Page Event Levels
- Alarm Page Format
- Alarm Page Types
- Alarm Pages
- System Error Pages
- Section 4: AlarmView™ Programmer Overview
- Programmer Product Description
- Using the Programmer
- Viewing and Editing Bed Numbers
- Viewing and Editing Pager Numbers
- Viewing and Changing Bed and Pager Assignments
- Viewing Current Transmitter Assignments
- Changing Transmitter Assignments
- Assigning All Pagers from the Transmitter
- Setting Reminder Page Delay
- Section 5: Maintenance, Service, and Support
- Cleaning Procedures
- Inspection and Testing
- Electromagnetic Interference (EMI)
- Appendix A: Basic Pager Functions
- Pager On/Off
- Power On
- Power Off
- Setting the Pager Functions
- Setting Tone
- Setting Time
- Setting Date
- Adjusting Screen Contrast
- Message Mode
- Viewing Messages
- Deleting Messages
- Deleting a Single Message
- Delete All Messages at Once
- Replacing Battery
- Removing and installing the battery
- Appendix B: Basic Programmer Functions
- Safety Information
- General Precautions
- Damage Requiring Service
- Servicing
- Heat
- Water and Moisture
- Accessibility
- Internal Battery
- Rechargeable Battery Pack
- Programmer Functions
- Programmer On/Off
- Turn on Backlight
- Adjusting Screen Contrast
- Setting Date/Time
- Batteries
- Recharging Main Programmer Battery
- Replacing Programmer Backup Battery

30 Part #880-0325-01 Rev. A
AlarmView™ System User’s Guide
b. To
delete
a bed number, highlight bed number and tap
the Backspace key until bed number field is empty.
c. To
add
a cap code (up to a total of 12), tap in an empty
cap code field and use the keyboard to enter the new
code.
5. If you make an error, tap the Backspace key on the key-
board to delete single characters, or tap RESTORE to
restore all values to what they were before you began
editing.
6. Tap SAVE to save your changes.
! After tapping SAVE, values cannot be restored. Repeat the edit
procedure to re-enter previous bed number.
7. Tap Exit button (in upper-right hand corner of the screen)
to return to SysMgr Main Screen. If you have made changes
and tap Exit before tapping Save, the programmer will
prompt you to “Save changes?” Tap Yes to save changes
and exit.
! IMPORTANT: When you save edits, entries are automatically
resorted alphabetically and numerically. The bed numbers you
changed or entered will move in the display to appear in their
new place in the sort, not necessarily in the field where you
made the changes. To view an edit you’ve made, look for the
bed number in its correct place in the alphanumeric sort.
! Lists of all bed numbers in the AlarmView System are retained
permanently in the programmer. The values in these lists are the
values that will be selectable when programming the transmitter.
These lists should be set up during installation of the AlarmView
System and should not be changed unless beds need to be
added or replaced.