
User's Guide
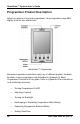
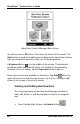
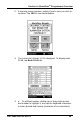
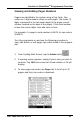
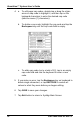
Table Of Contents
- _
- Using this Guide
- Procedures
- Warnings
- Cautions
- Notes
- For More Information
- Safety Information
- System Warnings
- Section 1: AlarmView™ System Overview
- Introduction
- AlarmView™ Transmitter
- AlarmView™ Pager
- AlarmView™ Programmer
- Section 2: AlarmView™ Transmitter Overview
- Transmitter Product Description
- Top Panel
- Antenna Connector
- On/Off Button
- Front Panel
- AC Indicator
- Transmitting Indicator
- Communications Indicator
- Infrared Port
- Rear Panel
- Monitor Input Port
- Power Input Port
- Using the Transmitter
- Transmitter Placement
- Turning Transmitter On
- Turning Transmitter Off
- Operating Transmitter On Battery Power
- Testing System Setup
- Send Test Page
- Section 3: AlarmView™ Pager Overview
- Pager Product Description
- Alarm Pages
- Alarm Page Event Levels
- Alarm Page Format
- Alarm Page Types
- Alarm Pages
- System Error Pages
- Section 4: AlarmView™ Programmer Overview
- Programmer Product Description
- Using the Programmer
- Viewing and Editing Bed Numbers
- Viewing and Editing Pager Numbers
- Viewing and Changing Bed and Pager Assignments
- Viewing Current Transmitter Assignments
- Changing Transmitter Assignments
- Assigning All Pagers from the Transmitter
- Setting Reminder Page Delay
- Section 5: Maintenance, Service, and Support
- Cleaning Procedures
- Inspection and Testing
- Electromagnetic Interference (EMI)
- Appendix A: Basic Pager Functions
- Pager On/Off
- Power On
- Power Off
- Setting the Pager Functions
- Setting Tone
- Setting Time
- Setting Date
- Adjusting Screen Contrast
- Message Mode
- Viewing Messages
- Deleting Messages
- Deleting a Single Message
- Delete All Messages at Once
- Replacing Battery
- Removing and installing the battery
- Appendix B: Basic Programmer Functions
- Safety Information
- General Precautions
- Damage Requiring Service
- Servicing
- Heat
- Water and Moisture
- Accessibility
- Internal Battery
- Rechargeable Battery Pack
- Programmer Functions
- Programmer On/Off
- Turn on Backlight
- Adjusting Screen Contrast
- Setting Date/Time
- Batteries
- Recharging Main Programmer Battery
- Replacing Programmer Backup Battery

Section 4: AlarmView
TM
Programmer Overview
Part #880-0325-01 Rev. A 27
u Keep the programmer connected to the AC adapter and plugged
in when it is not in use to ensure the programmer is always fully
charged.
u Ensure that the programmer’s main batteries are charged and a
full backup battery is installed at all times or the AlarmView
software and hospital specific data may be lost.
u Do not remove both the main and backup batteries from the
programmer at the same time, as the AlarmView software and
hospital specific data will be lost.
u Use the stylus that came with the programmer or other stylus
designed specifically for use with a handheld computer. Use of
other pointed items such as pens and pencils may damage the
programmer screen.
Using the Programmer
The AlarmView System Manager (SysMgr) software will be installed and
running when you receive the programmer. When you turn the program-
mer on, you will see the SysMgr main screen, with three buttons for
Assignments, Admin, and Service.
For all programming functions, use the stylus to tap the appropriate spot
on the screen to perform the desired action.