
User Manual


HISTORY
PatientNet Operator’s Manual, v1.04, 10001001-00X, Draft 143
All information contained herein is subject to the rights and restrictions on the title page.
Tagging Events as Report Candidates
You can designate events in a patient’s history file as report candidates. This allows
you to print reports of only these events.
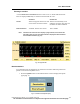
1. Highlight the event to be marked as a report candidate.
2. Press the Event button on the History screen and then the Report button. This
places an “R” to the right of the event number in the History blackboard. Press
Report a second time to cancel the report candidate status.
The Report button also appears on Chart popup (fig. 8 on page 139).
Printing Tagged Event Reports
Tagged event reports can print only on the laser printer; if you do not have a laser
printer, these reports are not available. If you have a laser printer but the system is
configured for strip printing, tagged event reports still print on the laser printer.
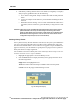
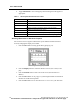
1. Press the Laser or Record button. The Print popup appears with three
choices.
2. Select one of the following popup buttons:
Tagged Events prints a report of all events tagged “R.”
Single Event (for bedside monitored and ambulatory patients only) prints only the
highlighted event.
Venti lat or Da t a (for ventilator patients only) prints all ventilator history events.
Cancel closes the popup without printing.
Fig. 67. Print popup
3. If you select Tagged Events, a second popup asks, “Do you wish to add a
comment to the tagged events report?”
a. Press No to print without comment.
b. Press Yes to display an on-screen keyboard on which you can type two
lines of text to appear on the printout. The on-screen Enter button toggles
between line 1 and line 2.
c. Press Exit on the on-screen keyboard when you have finished typing.