
User Manual

ADMIT, DISCHARGE, AND PATIENT DEMOGRAPHIC INFORMATION
PatientNet Operator’s Manual, v1.04, 10001001-00X, Draft 79
All information contained herein is subject to the rights and restrictions on the title page.
Printing a Discharge Report
To print a Discharge Report:
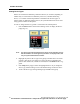
1. Select No on the Remote Discharge screen.
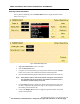
2. Click the Setup button on the menu tool bar.
3. Click the Discharge button on the Patient Settings screen. The Discharge
Report popup will appear. If you want to print a discharge report, click Ye s on
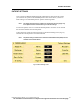
the popup; otherwise click No. The information printed on the Patient Dis-
charge Report is similar to that of the Patient Data Report, except that no ST
or alarm configuration data is printed.
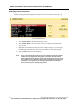
4. A confirmation popup appears asking if you want to clear patient data. Click
No to cancel the discharge request and retain the patient. Or click Ye s to clear
information and discharge the patient.
If there are tagged events in the patient’s history file (see page 142), another
popup informs you that continuing the discharge will erase these events. If
any reports are queued for printing, another popup informs you that continu-
ing with the discharge will cancel all queued reports.
CAUTION: Selecting Ye s permanently clears all patient data and discharges the patient.
The Discharge button now becomes Admit and may be used to admit a new
patient.
Note: Merely deleting the name or identifying information from the trace display
area does not stop data collection for the associated patient.
Note: The Room Number, Nursing Unit, Pager Number, and List Trend Report
parameters can be configured to be retained at the time of discharge.