
User Manual


PATIENT SETTINGS
86 PatientNet Operator’s Manual, v1.04, 10001001-00X, Draft
All information contained herein is subject to the rights and restrictions on the title page.
Assigning a Transceiver ID to a Patient
Note: This button is configurable in the system administrator screens. If this but-
ton is unavailable, then see your system administrator for details.
To assign a transceiver to a patient channel:
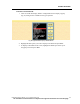
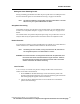
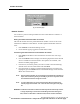
1. Click the Assign TX button on the Patient Settings screen (see Figure 34 on
page 81) to display the Assign Transceiver screen (fig. 37).
Fig. 37. Assign Transceiver Screen
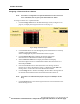
2. Use the arrow buttons to scroll through the patient channels that are currently
available on the Central Station.
Select and highlight the patient channel that will be assigned.
3. Click the Device ID button to display the Numeric Pad Popup.
Enter the Device’s Identification number and press Enter.
4. Select Transceiver ID button to display the Numeric Pad Popup.
Enter the 6-digit transceiver’s identification number from the transceiver’s
label and press Enter.
5. If an invalid identification is entered, then the error message “Invalid
transceiver (or device) ID. Please try again.” is displayed. Click OK in the
message box to re-enter the transceiver identification number.
6. Click the Ping button to measure and display the time that a message takes to
travel back and forth between the Central Station and the transceiver.
Note: This button is for administrative purposes only. Do not attempt to set the
Ping.
7. Click the Exit button to close the Assign Transceiver screen and return to the
Patient Settings screen.