
User Manual

USING THE RETROSPECTIVE VIEWER
182 PatientNet Operator’s Manual, v1.04, 10001001-00X, Draft
All information contained herein is subject to the rights and restrictions on the title page.
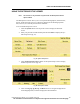
5. Click on the Up and Down arrows to highlight and select a patient for view-
ing.
6. Click the Archived button to toggle between Yes and No.
• Selecting Yes will prevent the selected patient data from being deleted from
the system. The maximum number of archived files is dependent on the sys-
tem in use.
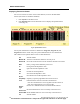
On 16 channel Central Stations, you can have up to 16 discharged
patients in the Retrospective Viewer, with 8 of those patients being saved
in the Archive.
On 8 channel Central Stations, you can have up to 24 discharged
patients in the Retrospective Viewer, with 16 of those being saved in the
Archive.
• Selecting No means that the file is no longer archived and places it back in
the rotation queue and will eventually be deleted before being used for a
newly admitted patient.
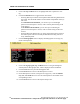
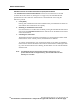
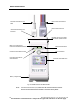
7. Click the Demographics button to display the demographics screen (fig. 89)
for the selected patient.
Fig. 89. Retrospective Viewer - View Data Demographics Screen
8. Click on the Pg Up, Pg Dn, Up, and Down arrows to navigate through the
selected patient’s demographic data, which is displayed in the blackboard.
9. Click the Laser button to print the demographic data.
10. Click the Exit button to return to the Retrospective Viewer.
11. On the Retrospective Viewer (see Figure 88 on page 181), click the FD, His-
tory, List, and Trend buttons to view the selected patient’s stored data on the
corresponding screens.
12. Click the Exit button to return to the System Setup screen.