
Installation manual


© Hills Industries 2009 Page 15
Programming The LED Code Pads
This section describes how to program the address and area of each code pad as well as the options that are available.
The code pad address allows the panel to monitor and supervise the connected code pads and report code pad
communication faults.
The factory default for the Master code is [1]-[2]-[3]-[4] when using a 4-digit code or [1]-[2]-[3]-[4]-[5]-[6] for a 6-digit code.
The factory default for the ‘Go To Program’ code is [9]-[7]-[1]-[3] for a 4-digit code or [9]-[7]-[1]-[3]-[0]-[0] for a 6-digit code.
1. Setting The LED Code Pad Starting Zone - Function [9] [2]
Step 1
Your system must be in the Disarmed state to program the code pad settings
Step 2 Press the []-[9]-[2] keys
Step 3 Enter the [Program Code]
Step 4
Enter the Starting zone number from 1 to 128.
Note that older code pads only support up to 48 zones (i.e. non “E” versions”). Keep this in mind when
expanding a site by replacing the panel – some code pads may also need replacing. On sites with >48
zones it is recommended to use an LCD code pad.
Step 5 Press [] to save changes and exit this function
2. Setting The LED Code Pad Options - Function [9] [3]
Step 1
Your system must be in the disarmed state to program the code pad settings
Step 2 Press the []-[9]-[3] keys
Step 3
Enter the [Program Code]. The ‘Service’ LED will flash
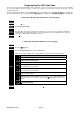
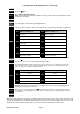
LEDs 1-8 can now be toggled on/off to enable/disable the functions listed in the table below:
LED Code Pad Option Enabled
1 Enable Code Pad tamper switch
2 Enable Silent Code Pad option
3 Enable Ding Dong sound for Chime – If off, chime will be a single tone.
4
Enable Key-press Silence option (silences the pulsing code pad sounder for 5
seconds when a key is pressed)
5
Enable Armed Status Suppression (faulted or bypassed zones will not display
on code pad when system armed)
6
Enable Panic, Fire, Medical Beep-tone (will sound a short beep to verify that the
key-press was accepted)
7
Suppresses the ‘Service’ LED (will not allow the ‘Service’ LED to illuminate for
any reason. If there is a system trouble, pressing []-[2] will still show the service
menu.)
8
Enable multi-area viewing (enables temporary viewing of all areas by pressing
[]-[1]-[Area Number])
Step 4
After enabling/disabling the desired functions press [] to save changes and exit this function.