
User's Manual


N332 Wireless Mini Optical Mouse User’s Guide
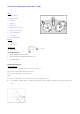
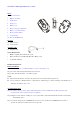
Mouse
1. Left mouse button
1
2
3
4
5
6
7
8
10
11
9
2. Right mouse button
3. Scroll wheel
4. Charge port
5. Battery cover
6. Receiver storage compartment
7. Battery cover release button
8. Receiver release button
9. Connect button
10. Power ON/OFF Switch
Receiver
11. USB connector
12. Connect button
Charging Cable
13. Charging cable
System Requirements
• IBM compatible PC or Macintosh system
• Microsoft Windows 98SE, 2000, Me, XP or Mac OS X
• An available USB port
Installation Instructions
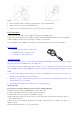
Battery Installation
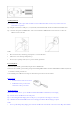
Step 1. Press the “Battery Cover Release Button” to remove the battery cover.
Step 2. Load two AAA rechargeable batteries into the mouse.
Step 3. Slide and lock the battery cover back into place.
NOTE:
Please insert the batteries correctly as the pictures. Don’t insert the batteries upside down.
Do not use Ni-Cd or alkaline batteries, or mix batteries of different types. Otherwise leakage of chemicals from or
damages to the batteries may occur.
Operating Instructions
Step 1. To ensure correct operation, please make sure that the receiver is installed at least 20cm (8 inches) away
from electronic devices (such as monitors or speakers).
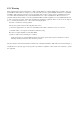
Step 2. Plug the receiver unit into a USB port on your system. The system will automatically detect the new hardware
and install the device.
Step 3. To activate, first press the CONNECT button on the receiver, and then the CONNECT button located on
the bottom of the mouse within 10 seconds of each other.