
Product Manual


22
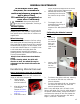
3. Pull wheel
guard cover
away from
wheel.
4. Using a 4 mm
hex key,
remove 3;
5mm socket
head cap
screws
(PP16318FF)& split washer (PP08650FF)
from grinding
wheel retainer.
5. Remove the
wheel retainer
6. Pull wheel
toward you
then to the
right and out of
the machine
cavity.
7. Clean the machine cavity as well as the
mounting hub and wheel before
reinstalling.
8. Repeat steps in reverse to install new
wheel.
NOTE: Because the Darex grinding wheel
cannot be trued it is critical that the motor hub &
wheel register be cleaned. Once wheel has been
installed, rotate the wheel by hand to check that
the wheels run true. If not, loosen the screws ,
reposition the wheel and tighten the screws.
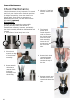
Separating grinding wheel from point split
wheel
The grinding and point
split wheel are piggy
backed and bolted
together. To change
any one of the wheels
you must first
separate them. You
can access the bolts
from the back side of
the sharpening wheel.
1. Using a 5mm
hex key, remove
the 3; 6mm
socket head cap
screws
(PP16348FF) &
split washers.
(PP10282FF)
2. The two wheels can now be separated.
Recalibrating
Material Removal
After a wheel change, verify
and/or recalibrate material
removal.
Use a 3/8 HSS standard twist drill, measure the
length of drill before sharpening.
1. Rotate material removal knob to maximum
take off.
2. Align drill as though
you intend to
sharpen it. Follow
Alignment steps on
page 11.
3. Once drill is set to
length, aligned
and captured in
Wheel Information