
Product guide


7
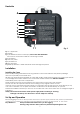
Backside
4
5
6
7
8
9
10
11 Fig. 2
4) 1,5 L Liquid tank
5) ON/OFF
6) 5-pin Wireless remote control input; also works with 50333 MKII
Use FL513 as connection cable for connecting to 50333
7) 3-pin DMX In
8) Fuse 10A / 250V
9) 3-pin DMX Out
10) AC 220~240V
11) DMX Dip Switches + DMX LED, blinks when DMX signal is present
Installation
Installing the Fazer
Remove all packing materials from the fog machine. Check that all foam and plastic padding is
removed, especially in the nozzle area.
Fill with Fog Liquid (ordercode 60603) or other high-quality water-based fog fluid. Any other types of fluid
can damage the unit. Be careful not to exceed the maximum fluid level. DO NOT OVERFILL.
When filled, place cap back on liquid tank.
Firmly attach the remote control cable to the proper input on the rear of the machine
The unit can also be operated at floor level or sitting on any regular surface as well.
If the unit is to be mounted using the bracket, it is important that the fog does not shoot directly at any
one’s face. Therefore, do not point the nozzle in a direction that will aim directly at a person.
Whatever installation method you choose, do not allow the unit to have more than a 15 degree angle of
inclination.
Always disconnect from electric mains power supply before cleaning or servicing.
Damages caused by non-observance are not subject to warranty.
Set Up and Operation
Before plugging the unit in, always make sure that the power supply matches the product specification
voltage. Do not attempt to operate a 120V specification product on 230V power, or vice versa.
Pay Attention !! Always monitor tank fluid level as you are fogging.
Running a fog machine with no fluid can permanently damage the unit.