
Installation guide

MAINTENANCE
BULLETINS
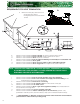
You would have found this drop chute along with your manuals.
This can have 2 purposes:
1) Drop chute attaches to the side of the hopper to help
with cleaning/emptying out of hopper
2) Chute can be used as a dustpan for your shop.
Keep this separate until needed.
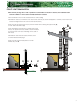
Unplug the appliance power cord from the wall outlet.
To gain access to the inside of the appliance, remove the 1/4 “
hex screws from the LEFT HAND SIDE PANEL (looking from the front
of the heater). These are located on the back left hand side
corner of the appliance.
Remove the panel by sliding it back toward the exhaust.
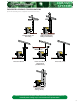
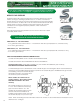
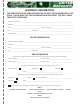
Remove the two 1/4” hex screws (A & B).
Install the hopper drop chute, reinstalling the screws.
Remove five of the 1/4” hex screws from the side hopper access
panel (#1-5 at right). Loosen the #6 screw but leave it attached.
This now allows the access panel to act as a door.
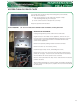
Place a catch pail under the drop chute. Raise & lower the access
panel as needed.
When finished cleaning out as many pellets as possible, reinstall the
5 screws, remove the drop chute, replace the 2 screws and reinstall
the side panel.
INSTALLATION PROCEDURE
TOOLS REQUIRED: 1/4” hex nut setter/driver OR flat head screwdriver, and a pail or bin
HOPPER CLEAN-OUT DROP CHUTE
13
Access
Panel
1
2
3
4
56
A
B