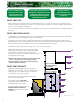
PELLET STOVE INSTALLATION GUIDE SHOP & GARAGE HEATERS Manufactured by For the following models: CC1, CC2, CC3, CCGB1, CCGB2, CCGB3 Marketed by Installations shall conform to: CAN/CSA B365 Installation Code For Solid-Fuel-Burning Appliances and Equipment in Canada and NFPA 211 Chimney, Fireplaces, Vents and Solid Fuel Burning Appliances in the USA READ THIS ENTIRE MANUAL BEFORE INSTALLING YOUR PELLET STOVE/HEATER/INSERT.
FOREWORD TO NEW OWNERS Dear Pellet Appliance Owner, Congratulations on the purchase of your wood pellet appliance. You have selected the finest in residential wood pellet heating technology. This INSTALLATION GUIDE will walk you through the proper installation of your wood pellet stove, heater or insert. This guide will provide you with valuable information regarding placement of the appliance, different installation options, and exhaust considerations.
INSTALLATION & PLANNING CHECKLIST Unless you are knowledgeable and experienced in stove installation, we recommend your stove receive a pre-delivery check and be installaed by your local specialty retailer or certified HVAC service depot. COMPLETE THIS CHECKLIST PRIOR TO INSTALLING YOUR PELLET APPLIANCE: Carefully read this INSTALLATION GUIDE. SAVE THIS GUIDE FOR FUTURE USE! Have your local Dealer demonstrate all operational, cleaning & maintenance steps necessary for your stove.
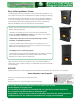
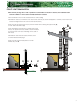
HOME/SHOP HEATER CONFIGURATIONS HOME/SHOP HEATER SPECIFICATIONS 22” 23” MINIMUM CLEARANCES TO COMBUSTIBLES 28” 2” Air Inlet 1” from BACK of stove to combustibles + 7” 3” Dia.
HOME/SHOP HEATER CONFIGURATIONS CLEARANCES: ‘DIRECT VENT INSTALLATION’ 18” 12” 10” 10” 3” 10” Venting should terminate no less than 12” away from outside walls. 6” 6” 12” INTERIOR VERTICAL DIRECT THROUGH WALL 1” 1” 6” NOTE: If interior vent is used, the clearance to the back wall is determined by the upward-turned elbow or TEE. It will vary in depth depending on the brand of PL vent used. 18” 1” 1” 3” 10” Before placing the stove, connect the elbow or TEE and measure off the 3” clearance.
EXHAUST SYSTEMS DO NOT CONNECT THE PELLET VENT TO A VENT SERVING ANY OTHER APPLIANCE OR STOVE PELLET VENT MUST MAINTAIN A MINIMUM 3” CLEARANCE TO ANY COMBUSTIBLE (INSTALL VENT AT CLEARANCES SPECIFIED BY THE VENT MANUFACTURER) DO NOT INSTALL A FLUE DAMPER IN THE EXHAUST VENTING SYSTEM OF THIS UNIT PELLET VENT TYPE Pellet venting must be approved 3” or 4” diameter type PL or L.
EXHAUST SYSTEMS PELLET VENT TERMINATION NOTE: Where passage thru a wall or partition of combustible contruction is desired, the installation shall conform to NFPA 211 in the USA and CAN/CSA B365 in Canada Vent termination must not be recessed into a wall or siding Termination must be a minimum of 6” above the chimney as shown at A (NOTE: Chimney must meet local codes for height above the roof or other obstructions) There must be an approved cap to prevent water from entering the pipe shaft (B), o or a 45 el
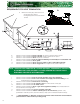
EXHAUST SYSTEMS REQUIREMENTS FOR VENT TERMINATION A Minimum 3 feet (36”) above the roof and 2 feet (24”) above the highest point of the roof within 10 feet A 3’ 2’ 10’ M Q F E N K H B B D C L P J F B C D E F G H G I O Minimum 4 foot clearance below or beside any door or window which opens Minimum 1 foot clearance below or beside window that does not open Minimum 1 foot clearance above any door or window Minimum 3 foot clearance from any adjacent building or horizontally from combustible w
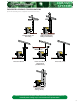
EXHAUST SYSTEMS SUGGESTED VENTING CONFIGURATIONS (shown with freestanding stoves; configurations are the same for heaters) Stanard vertical vent thru roofing Vertical vent tying into existing metal chimney Minimum 16” Direct vent with rise Direct vent with rise (also shown in possible alcove) Direct vent, no rise Standard vent in existing chimney Please review previous sections of this manual for complete list of clearances. Install all pellet venting as per vent manufacturer specifications.
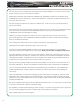
SAFETY PRECAUTIONS Do NOT operate if you smell smoke coming from your pellet appliance. Push OFF on the control board, monitor your stove and call your dealer. NEVER USE GASOLINE, GASOLINE-TYPE LANTERN FUEL, KEROSENE, CHARCOAL LIGHTER FLUID or similar liquids to start or ‘freshen up’ a fire in this appliance. Keep all such liquids well away from the stove while it is in use. Do NOT unplug the heater if you suspect a malfunction. Push OFF on the control board and inspect the heater.
SAFETY PRECAUTIONS Disconnect the power cord before performing any maintenance. IMPORTANT: Touching the OFF button on the control board does NOT disconnect power to the stove. DO NOT THROW YOUR INSTRUCTIONAL GUIDES AWAY. These guides have important operating & maintenance information that you will need at a later time. Do not place clothing or other flammable items on or near the stove.
OUTSIDE AIR CONSIDERATIONS A fresh air kit is HIGHLY RECOMMENDED for all pellet appliance installations. If an outside air source is not supplied, a negative air situation may occur. NEGATIVE AIR PRESSURE Negative indoor air pressure results when more air is leaving your home than is coming in, creating a partial vacuum. In winter, the heated indoor air rises up through the home and escapes from upper level leaks.
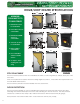
MAINTENANCE BULLETINS HOPPER CLEAN-OUT DROP CHUTE You would have found this drop chute along with your manuals. This can have 2 purposes: 1) Drop chute attaches to the side of the hopper to help with cleaning/emptying out of hopper 2) Chute can be used as a dustpan for your shop. Keep this separate until needed. TOOLS REQUIRED: 1/4” hex nut setter/driver OR flat head screwdriver, and a pail or bin INSTALLATION PROCEDURE Unplug the appliance power cord from the wall outlet.
LIMITED WARRANTY CANADIAN COMFORT INDUSTRIES (CCI) LIMITED WARRANTY CCI wood pellet and corn appliances carry a one (1) year -parts only- on electrical components and a five (5) year limited warranty from the date of sale to the original owner against defects and workmanship on all steel parts (excluding the burn grate and the heat tube scraper / rod). If defective in material or workmanship, during the warranty period, CCI will, at its option, repair or replace the product as described below.
LIMITED WARRANTY WARRANTY REGISTRATION THIS REGISTRATION INFORMATION MUST BE ON FILE FOR THIS WARRANTY TO BE VALID. PLEASE MAIL/FAX THIS INFORMATION WITHIN THIRTY (30) DAYS FROM THE DATE OF PURCHASE.
My local dealer is: To register your purchase, visit www.dansons.com/support Technical Support Monday to Friday, 9 am to 8 pm EST 1-877-303-3134 Saturday, 11 am to 7 pm EST 1-866-456-9269 COPYRIGHT Copyright 2006, Canadian Comfort Industries. All rights reserved.