
Full Product Manual
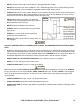


VISIT US ON THE WEB AT WWW.DANNMAR.COM22
TO RAISE THE LIFT
To avoid personal injury and / or property damage, permit only trained personnel to operate lift. After
reviewing these instructions, get familiar with lift controls by running the lift through a few cycles before
loading vehicle on lift. Always lift the vehicle using all four adapters. NEVER raise just one end, one corner,
or one side of vehicle.
1. Before Loading: Lift must be fully lowered and service bay clear of all personnel before the vehicle is
brought on lift with the swing arms set to the full drive thru position.
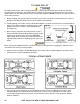
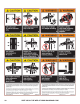
2. Loading: Swing arms under vehicle and position adapters at vehicle manufacturer’s recommended lift
points. Use height extenders or optional frame cradle
adapters when necessary to ensure good contact.
(See figure 16)
3. Some vehicles may have the manufacturer’s Service
Garage Lift Point locations identified by triangle shape
marks on the undercarriage (reference ANSI/SAE
J2184-1992). Also, there may be a label located on the
right front door jamb area showing specific vehicle lift
points.
Many specialty or modified vehicles cannot be raised on a two post frame engaging lift. Contact vehicle
manufacturer for raising or jacking details.
4. Position vehicle for proper weight distribution arms under vehicle to allow adapters to contact at the
manufacturer’s recommended pick up points.
TYPICAL LIFTING POINTS
5. If the specific vehicle lift points are not identified, or if the vehicle has additional or uniquely posi-
tioned payload, have a qualified person calculate the vehicle center of gravity or have the vehicle
center of gravity determined at a vehicle scale. Load the vehicle with the center of gravity midway
between adapters.
WARNING
WARNING
Fig: 16