
Installation guide


20
VMBME102
9 Start up
NOTE! Read the safety instructions!
⚠
The installation may only be commissioned if the heating
system, water heater and brine system have been filled and
bled. Otherwise the circulation pumps can be damaged.
⚠
If the installation is only to be run on auxiliary heating, first
ensure that the heating system is filled and bled and that nei-
ther the brine pump nor the compressor can be started. This
is carried out by setting the operating mode to ADD.HEAT.
9.1 Installation checklist
Before manual test operation check the following points:
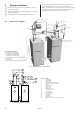
Piping installation, heating system
• Pipe connections in accordance with the connection diagram
• Flexible hoses on the supply and return pipes
• Pipe insulation
• Strainer on return pipe, heating system
• Bleeding of the heating system
• All radiator valves fully open
• Expansion tank heating system (not included in the delivery)
• Safety valve for expansion tank (not included in the delivery)
• Filler cock, heating system (not included in the delivery)
• Leakage inspection
• Exchange valve
• Safety valve for cold water (9 bar)
Electrical Installation
• Circuit-breaker
• Fuse protection
• Direction of rotation of the compressor
• Coolant pump
• Outdoor unit
• Defroster sensor
• Positioning of the outdoor sensor
• Control computer settings
• Exchange valve
Brine system
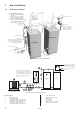
• Expansion/bleed tank on the return pipe when the outdoor unit
is located at the same level or lower than the heat pump.
• Pressure tank connected to expansion tank on water heater
when the outdoor unit is higher than the heat pump.
• Safety valve (1.5 bar) on the expansion/bleed tank
• Filler cock on the return pipe
• Insulation in the outside wall lead-in
• Other brine pipe insulation
• Bleeding of brine system
• Leakage inspection
9.2 Manual test
Test operate and at the same time check the function of the tested
components.
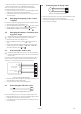
Activate MANUAL TEST
1. Ensure that the main circuit breaker is on.
2. Select operating mode
(OFF), in the menu INFORMATION ->
OPERAT.->
3. Open the SERVICE menu by pressing
and for three seconds.
4. Set the value for MANUAL TEST to 2.
⚠
NOTE! Select position 2 to navigate away from the MANUAL
TEST menu during ongoing test operation!
Test the brine pump
5. Start the brine system’s brine pump by setting the value
BRINEPUMP to 1.
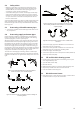
6. Check that the brine pump is running by:
• listening
• putting a hand on the pump
• checking that the level in the expansion tank is stable. If the level
is not stable there is air in the system.
• listen for air
7. If the pump does not start see the section, “Starting circulation
pumps manually”.
8. If there is air in the brine system, bleed according to section,
“Bleeding the brine circuit”.
9. Stop the brine pump by setting the value back to 0.
Test the circulation pump
10. Start the heating system circulation pump by setting the value
CIRC.PUMP to 1.
11. Check that the circulation pump is running by:
• listening
• putting a hand on the pump
• listen for air
12. If the pump does not start see the section, “Starting circulation
pumps manually”.
13. If there is air in the heating system, bleed according to section,
“Bleeding the heating system”.
14. Stop the circulation pump by setting the value back to 0.
Test the external exchange valve
15. Activate the 3-way valve by setting the value VXV WARMWATER
to 1.
16. Check that the arm on the 3-way valve changes position.
17. If the arm does not change position, see the “Troubleshooting”
section in the service instructions.
Test the compressor
18. Start the circulation pump by setting the value CIRC.PUMP to 1
19. Start the heat pump compressor by setting the value
HEATPUMP to 1. At the same time as the value is set to 1 for
HEATPUMP the brine pump starts.