
Operating Instructions and Installation Instructions


4
Installation
Installation
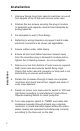
1. Unscrewxingsringsfromselectorswitches,moveall
fourtappetstotopofdialandremoveoutercase.
2. Slackenthetwoscrewssecuringtheplug-inmodule
tobackplateandseparatemodulefrombackplateby
pullingupwards.
3. Fixbackplatetowall(3holexing).
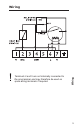
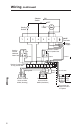
4. Referringtowiringdiagramsonpages5and6make
electricalconnectionsasshown(asapplicable).
5. Securecablesundercableclamp.
6. Ensurealldustanddebrishasbeenclearedaway
fromtheareathenplugintimeswitchmoduleandre-
tightenthe2retainingscrews-donotovertighten.
7. Removecutoutfrombottomofoutercaseasrequired.
Retoutercaseandselectorswitchxingrings.
Checkthatoutercasesitssquarelyonbodyandisnot
distortedbyanunevenwallsurface.
8. Rotatedialclockwisethroughatleastonecomplete
revolutionandcheckthatallfourtappetsareclearof
outercaseaperture.
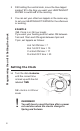
9. Switchonmains,turnmainselectorswitchto‘ON’and
lightboileraccordingtomanufacturer’sinstructions.
OperateHeatingSwitchtocheckpump/fan.
10. Turnmainselectorswitchto‘TIMED’androtatedial
clockwisemanuallythroughatleastonecomplete
revolutiontocheckthateachtappetstrikestheindex
wheelcleanlyandoperatestheboiler/pumpcorrectly
accordingtothetimessetonthedial.