
Install Instructions
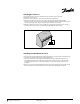

A feeder cable for a sensor may be needed. A 50’ (15m) cable is supplied with each sensor.
Approx. 1.5’ (0.5m) of this cable should be coiled inside the bottom of the sensor tube. The
remaining cable may be extended. The feeder cable must be a four wire cable.
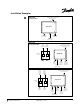
Installing a Sensor Cable
The sensor and the conduit may be installed in connection with the actual construction work
and connected at a later date. The following applies for all types of installations:
1: Ensure that the conduit is sealed when the concrete is poured.
2: The conduit must be positioned so that it is flush with the surrounding terrain. The sensor
must be placed so that the upper brass surface is horizontal.
3: The base below the tube must be hard, e.g. a concrete plate or similar, in order to ensure that
the sensor is not pushed into the ground if e.g. a vehicle runs over it. The tube is designed to
be mounted on a plate using the two screw holes inside the conduit.
4: A metal/plastic pipe, through which the sensor cable may be passed, should be run as far as
the sensor conduit.
5: Coil approx. 1.5’ (0.5m) of the sensor cable inside the conduit.
6: Place the sensor inside the tube until it is horizontally flush with the edge of the conduit and
"resting" on the internal collar inside the conduit. The sensor may be extracted at a later date
using the two holes found around the edge of the sensor conduit. The grooves on the outside
of the sensor should correspond with the holes in the conduit.
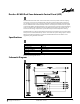
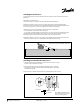
Installing a Ground Sensor and a Conduit
The temperature must not exceed 176 F (80°C) around the sensor/tube. A wooden block or
similar may be placed in the area where the tube/sensor can be placed subsequently. The
installation pipe used for the sensor cable should, in that case, be a metal tube that can
withstand the high temperatures.
°
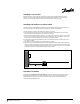
Installation in Asphalt
Installation of conduit with sensor cable
CD-ST
Presetting
2
CD-ST
Presetting
2
Copyright 2009 Danfoss Inc.
6
EFH.IM.GX850 - 11/2009