OWNER’S MANUAL MANUEL DU PROPRIÉTAIRE MANUAL DEL PROPIETARIO DEHUMIDIFIER Owner’s Manual...............................1 - 9 DÉSHUMIDIFICATEUR Manuel du propriétaire.................10 - 18 MODEL • MODÈLE • MODELO DDR095BDPWDB DESHUMIDIFICADOR Manual del propietario.................19 - 27 DANBY PRODUCTS LIMITED, ONTARIO, CANADA N1H 6Z9 DANBY PRODUCTS INC., FINDLAY, OHIO, USA 45840 2017.09.
Welcome Welcome to the Danby family. We are proud of our quality products and we believe in dependable service. We suggest that you read this owner’s manual before plugging in your new appliance as it contains important operation information, safety information, troubleshooting and maintenance tips to ensure the reliability and longevity of your appliance. Visit www.Danby.com to access self service tools, FAQs and much more. For additional assistance call 1-800-263-2629.
Important Safety Information READ AND FOLLOW ALL SAFETY INSTRUCTIONS SAFETY REQUIREMENTS GROUNDING INSTRUCTIONS This appliance is not intended for use by persons (including children) whose physical, sensory or mental capabilities may be different or reduced, or who lack experience or knowledge, unless such persons receive supervision or training to operate the appliance by a person responsible for their safety. This appliance must be grounded.
OPERATING INSTRUCTIONS LOCATION FEATURES • Place the dehumidifier on a smooth, level floor that is strong enough to support the appliance with a full bucket of water. Front 1. 2. 3. 4. • To maintain efficiency, operate the appliance in an enclosed area. Keep nearby doors and windows closed.
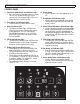
OPERATING INSTRUCTIONS CONTROL PANEL 6. Power Button • Use this button to turn the appliance on or off. 1. Continuous Mode Button and Indicator Light • Press this button to activate continuous mode. This will run the dehumidifying function continuously. The indicator light will turn on when continuous mode is active. 2. Timer Button and Indicator Lights • Use this button to set the timer function. 7. Pump Button and Indicator Light • Use this button to activate the drain pump.
OPERATING INSTRUCTIONS TIMER FUNCTION WATER REMOVAL Auto On Function There are three ways to remove collected water from the appliance. 1. Press the timer button until the auto on indicator light illuminates. 2. Use the up and down arrows to select the desired amount of time before the appliance should turn on. The up and down arrows will add or subtract 30 minutes of time up to 10 hours, then at 1 hour increments up to a maximum of 24 hours. 3.
OPERATING INSTRUCTIONS WATER REMOVAL WATER REMOVAL 2. Continuous Drain 3. Pump Drain Water can be removed from the appliance using the continuous drain and a standard garden hose (not provided). If the continuous drain is inconvenient, water can be removed from the appliance using the pump drain. When using the pump, the appliance will first fill the bucket with water and then the pump arm will pump water from the bucket through the drain and out the hose.
CARE & MAINTENANCE AIR FILTER CLEANING The air filter should be cleaned approximately every 2 weeks. The air filter may require more frequent cleaning if there is significant dander or fur in the air. To avoid possible electric shock, ensure that the appliance is unplugged before performing any cleaning or maintenance. The outside of the appliance can be wiped clean with a soft cloth or with a lukewarm, damp cloth if necessary.
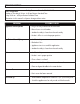
TROUBLESHOOTING Danby Consumer Care: 1-800-263-2629 Hours of operation: Monday to Thursday 8:30 am - 6:00 pm Eastern Standard Time Friday 8:30 am - 4:00 pm Eastern Standard Time Information in this manual is subject to change without notice.
LIMITED IN-HOME WARRANTY LIMITED “CARRY APPLIANCE IN” WARRANTY This quality product is warranted to be free from manufacturer’s defects in material and workmanship, provided that the unit is used under the normal operating conditions by the manufacturer.to be free from manufacturer’s defects in material and workmanship, provided that the unit is used This qualityintended product is warranted under the normal operating conditions intended manufacturer.
Bienvenue Bienvenue à la famille Danby. Nous sommes fiers de la qualité de nos produits et nous croyons en le service fiable. Nous vous suggérons de lire ce manual d’utilisation avant de brancher votre nouvel appareil car il contient des informations inportantes sur l’utilisation, la sécurité, le dépannage et la maintenance, afin d’assurer la fiabilité et la longévité de votre appareil. Visitez www.Danby.com pour accéder aux outils d’autoservice, aux FAQ et bien plus encore.
Informations importantes de sécurité LIRE ET SUIVRE TOUTES LES INSTRUCTIONS DE SÉCURITÉ EXIGENCES DE SÉCURITÉ INSTRUCTIONS DE MISE À LA TERRE Cet appareil n’est pas destiné à être utilisé par des personnes (y compris des enfants) dont les capacités physiques, sensorielles ou mentales peuvent être différentes ou réduites, ou qui n’ont pas d’expérience ou de connaissances, à moins que ces personnes ne soient surveillées ou formées pour faire fonctionner l’appareil par une personne responsable de leur sécuri
INSTRUCTIONS D’UTILISATION EMPLACEMENT CARACTÉRISTIQUES • Placez le déshumidificateur sur un plancher lisse et plat qui est assez solide pour supporter l’appareil avec un seau complet d’eau. Avant • Pour maintenir l’efficacité, faites fonctionner l’appareil dans une zone fermée. Gardez les portes et les fenêtres fermées à proximité. 1. 2. 3. 4.
INSTRUCTIONS D’UTILISATION PANNEAU DE CONTRÔLE 1. Bouton de mode continu et voyant lumineux • Appuyez sur ce bouton pour activer le mode continu. Cela entraînera en continu la fonction de déshumidification. Le voyant s’allume lorsque le mode continu est activé. 2. Bouton de minuterie et voyants lumineux • Utilisez ce bouton pour régler la fonction de minuterie. 3. Voyant lumineux de dégivrage • Le témoin de dégivrage s’allume lorsque le givre s’est accumulé à l’intérieur de l’appareil.
INSTRUCTIONS D’UTILISATION FONCTION DE MINUTERIE ELIMINATION D’EAU Fonction d’activation automatique Il existe trois façons d’éliminer l’eau collectée de l’appareil. 1. Appuyez sur le bouton de la minuterie jusqu’à ce que le voyant d’activation automatique s’allume. 2. Utilisez les flèches haut et bas pour sélectionner la durée souhaitée avant que l’appareil ne s’allume.
INSTRUCTIONS D’UTILISATION ELIMINATION D’EAU ELIMINATION D’EAU 2. Drain continu 3. Vidange de pompe L’eau peut être retirée de l’appareil à l’aide du drain continu et d’un tuyau d’arrosage standard (non fourni). Si le drain continu est gênant, l’eau peut être retirée de l’appareil à l’aide du drain de la pompe. Retirez le couvercle de la sortie de vidange continue et fixez l’extrémité filetée femelle du tuyau d’arrosage à l’arrière de l’appareil.
SOINS ET MAINTENANCE FILTRE À AIR NETTOYAGE Le filtre à air doit être nettoyé environ toutes les 2 semaines. Le filtre à air peut nécessiter un nettoyage plus fréquent si il y a un choc important ou de la fourrure dans l’air. Pour éviter tout risque d’électrocution, assurez-vous que l’appareil est débranché avant d’effectuer un nettoyage ou une maintenance. Environ toutes les deux semaines, le voyant du filtre sur le panneau de commande s’allume comme un rappel pour nettoyer le filtre.
DÉPANNAGE Danby soins du consommateur: 1-800-263-2629 Heures d’ouverture: Lundi à Jeudi 8 h 30 à 18 h, heure normale de l’Est Vendredi de 8 h 30 à 16 h, heure normale de l’Est Les informations contenues dans ce manuel sont sujettes à modification sans préavis.
LIMITED IN-HOME APPLIANCE WARRANTY GARANTIE LIMITÉE “EN ATELIER” Thisappareil quality product is warranted be free from manufacturer’s defectsdein matière material and workmanship, that the unit is utilisé useddans underles theconditions normal operating Cet de qualité est to garanti exempt de tout vice première et deprovided fabrication, s’il est normales conditions intended by the manufacturer. recommandées par le fabricant.
Bienvenido Bienvenido a la familia Danby. Estamos orgullosos de nuestros productos de calidad y creemos en un servicio confiable. Sugerimos que lea este manual del propietario antes de conectar el nuevo aparato ya que contiene información importante sobre la operación, información de seguridad, solución de problemas y consejos de mantenimiento para garantizar la fiabilidad y longevidad de su electrodoméstico. Visite www.Danby.com para acceder a herramientas de autoservicio, preguntas frecuentes y mucho más.
Informacion de Seguridad Importante LEA Y SIGA TODAS LAS INSTRUCCIONES DE SEGURIDAD REQUERIMIENTOS DE SEGURIDAD INSTRUCCIONES DE CONEXION A TIERRA Este aparato no está diseñado para ser utilizado por personas (incluyendo niños) cuyas capacidades físicas, sensoriales o mentales sean diferentes o reducidas, o que carezcan de experiencia o conocimiento, a menos que dichas personas reciban supervisión o entrenamiento para operar el aparato por una persona responsable de su la seguridad.
INSTRUCCIONES DE OPERACIÓN UBICACIÓN CARACTERISTICAS • Coloque el deshumidificador en un piso liso y nivelado que sea lo suficientemente fuerte para sostener el aparato con un cubo lleno de agua. Frente • Para mantener la eficiencia, haga funcionar el aparato en un lugar cerrado. Mantenga las puertas y ventanas cercanas cerradas. 1. 2. 3. 4.
INSTRUCCIONES DE OPERACIÓN PANEL DE CONTROL 6. Botón de encendido • Utilice este botón para encender o apagar el aparato. 1. Botón de modo continuo y luz indicadora • Pulse este botón para activar el modo continuo. Esto ejecutará la función de deshumidificación continuamente. La luz indicadora se encenderá cuando el modo continuo esté activo. 7. Botón de la bomba y luz indicadora • Utilice este botón para activar la bomba de drenaje. La luz indicadora se iluminará cuando la bomba esté activa. 2.
INSTRUCCIONES DE OPERACIÓN FUNCIÓN DEL TEMPORIZADOR REMOCION DE AGUA Función encendido automático Hay dos formas de eliminar el agua recogida del aparato. 1. Pulse el botón del temporizador hasta que se ilumine la luz indicadora de encendido automático. 2. Utilice las flechas arriba y abajo para seleccionar la cantidad de tiempo deseada antes de encender el aparato.
INSTRUCCIONES DE OPERACIÓN REMOCION DE AGUA REMOCION DE AGUA 2. Drenaje Continuo 3. Drenaje de la bomba El agua se puede retirar del aparato usando el drenaje continuo y una manguera de jardín estándar (no suministrada). Si el drenaje continuo es inconveniente, el agua puede ser retirada del aparato usando el drenaje de la bomba. Retire la cubierta de la salida de drenaje continua y fije el extremo roscado hembra de la manguera de jardín a la parte posterior del aparato.
CUIDADO Y MANTENIMIENTO FILTRO DE AIRE LIMPIEZA El filtro de aire debe limpiarse aproximadamente cada 2 semanas. El filtro de aire puede requerir una limpieza más frecuente si hay caspa o pelaje en el aire. Para evitar posibles descargas eléctricas, asegúrese de que el aparato esté desenchufado antes de realizar cualquier limpieza o mantenimiento. Aproximadamente cada dos semanas, la luz indicadora del filtro en el panel de control se iluminará como un recordatorio para limpiar el filtro.
SOLUCIÓN DE PROBLEMAS Danby cuidado del consumidor: 1-800-263-2629 Horas de operación: Lunes a Jueves 8:30 am - 6:00 pm Hora estándar del este Viernes 8:30 am - 4:00 pm Hora estándar del este La información de este manual está sujeta a cambios sin previo aviso.
GARANTÍA LIMITADA “ACARREADO LIMITED IN-HOME APPLIANCESOLAMENTE” WARRANTY Este de calidad contra defectos de fabricación, incluyendo mano obra, siempre y cuando Thisproducto quality product is warrantedestá to begarantizado free from manufacturer’s defects in material and workmanship, providedpartes that theyunit is deused under the normal operating la unidad se intended utilice bajo condiciones normales de funcionamiento para las que fue diseñado. conditions by thelas manufacturer.
NOTES / REMARQUES / NOTAS : __________________________________________________________________________________________ __________________________________________________________________________________________ __________________________________________________________________________________________ __________________________________________________________________________________________ __________________________________________________________________________________________ _____________________________
NOTES / REMARQUES / NOTAS : __________________________________________________________________________________________ __________________________________________________________________________________________ __________________________________________________________________________________________ __________________________________________________________________________________________ __________________________________________________________________________________________ _____________________________
NOTES / REMARQUES / NOTAS : __________________________________________________________________________________________ __________________________________________________________________________________________ __________________________________________________________________________________________ __________________________________________________________________________________________ __________________________________________________________________________________________ _____________________________
MODEL MODEL •• MODÈLE MODÈLE •• MODELO MODELO DDR095BDPWDB Printed in China Imprimé en Chine Impreso en China Danby Products Limited, Guelph, ON, Canada N1H 6Z9 Danby Products Inc.