OWNER’S USE AND CARE GUIDE GUIDE D’UTILISATION ET D'ENTRETIEN GUÍA DE UTILIZACIÓN Y CUIDADO PARA EL PROPIETARIO MODEL • MODÈLE • MODELO DBC039A1BDB DANBY PRODUCTS LIMITED, ONTARIO, CANADA N1H 6Z9 DANBY PRODUCTS INC., FINDLAY, OHIO, USA 45840 2016.12.
CONTENTS / TABLE DES MATIÈRES Owner’s Use and Care Guide..........................................1-10 • Safety Instructions • Installation Instructions • Features • Operating Instructions • Care and Maintenance • Troubleshooting • Warranty Guide d’utiliser et soin propriètaire..............................11-20 • Consignes de sécurité • Notice d’installation • Caractéristiques • Consinges d’utilisation • Soins et entretien • Dépannage • Garantie Guía de uso y cuidado del propietario........................
Welcome Welcome to the Danby family. We are proud of our quality products, and we believe in dependable service. We suggest that you read this Owner’s Manual before plugging in your new appliance as it contains important operational information, safety information, troubleshooting and maintenance tips to ensure the reliability and longevity of your appliance. Visit www.Danby.com to access self-service tools, FAQs and much more. For additional assistance call 1-800-263-2629.
Important Safety Information READ AND FOLLOW ALL SAFETY INSTRUCTIONS ELECTRICAL REQUIREMENTS • • • • • • • • • • • • • • • • • This appliance must be grounded. Connect only to a properly grounded outlet. Do not operate this appliance if it has a damaged power cord or plug or if the appliance has been damaged or dropped. Never allow children to operate, play with, or crawl inside the appliance. Never clean appliance parts with flammable fluids. The fumes can create a fire hazard or explosion.
Important Safety Information READ AND FOLLOW ALL SAFETY INSTRUCTIONS FOR YOUR SAFETY • • • • • • • • • • • • Two people should be used when moving the wine cooler. Remove interior and exterior packaging prior to installation. Before connecting the appliance to a power source, let it stand upright for approximately 4 hours; this will reduce the possibility of a malfunction in the cooling system from handling during transportation.
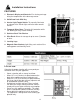
Installation Instructions FEATURES 1. Electronic Display and Controls: For viewing and regulating the temperature of the beverage center. 2. Child Proof Lock With Key 3. Interior Light Toggle Switch: To manually illuminate or extinguish the interior lights while the door remains closed. 4. Tempered Glass Door: Tinted for UV protection while still allowing for easy interior viewing. 5. Stainless Steel Trim Shelves 6. Wine Rack: Allows for storage of up to seven (7) bottles of wine. 7. Leveling Legs 8.
Operating Instructions CONTROL PANEL 1. Run: Indicator light illuminates to signify that the cooling mode is currently in operation. 2. Set Temperature Display: Display screen shows the temperature setting. 3. Cabinet Temperature Display: Display screen shows the current cabinet temperature. 4. °C/°F: Adjacent indicator light denotes which scale of temperature is displayed. 5. Up (+) Button: Used to raise the temperature (warmer) in 1° degree increments. 6.
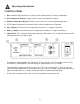
Operating Instructions BEVERAGE STORAGE The maximum capacity of this unit is 124 (350 ml) cans or 88 cans and 7 (750 ml) wine bottles. SHELVES To remove a shelf from its locked position, tilt the shelf as shown in Fig. A and pull outward. To reinstall, ensure the shelf is resting securely on the support brackets and push the shelf inward until it locks into place. Note: The bottom wine rack is not secured in place. Do not attempt to pull on the rack when it is stocked.
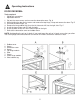
Operating Instructions DOOR REVERSAL Tools required: • Phillips #2 screwdriver • Adjustable wrench 1. 2. 3. 4. 5. 6. 7. Pull out the screw covers and unscrew the decorative cover. Fig. A While holding the door firmly, loosen and remove the top hinge, lift up and remove the door. Fig. B Unscrew the lower hinge. (8) Remove the long cabinet leg (9) on the left side and shift it to the right side. Fig. C Install the lower hinge and tie it with the bolts.
Care and Maintenance CLEANING Cleaning the Inside: • Walls, floor, inside window and shelves - Some water deposits and dust can be removed with a dry paper towel, others may require a damp cloth. Cleaning the Outside: • Outer Case - It is important to keep the area clean where the door seals against the cabinet. Clean this area with a soapy cloth. Rinse with a damp cloth and let dry. • Control Panel and Door - Wipe with a damp cloth and dry thoroughly.
Troubleshooting Occasionally, a problem is minor and a service call may not be necessary. Use this troubleshooting guide for a possible solution. If the unit continues to operate improperly, call an authorized service depot or our Toll Free Number 1-800-263-2629 for assistance.
LIMITED IN-HOME APPLIANCE WARRANTY LIMITED IN-HOME APPLIANCE WARRANTY This quality product is warranted to be free from manufacturer’s defects in material and workmanship, provided that the unit is used under the normal operating This quality product warranted to be free from manufacturer’s defects in material and workmanship, provided that the unit is conditions intended by theismanufacturer. used under the normal operating conditions intended by the manufacturer.
Bienvenue Bienvenue dans la famille Danby. Nous sommes fiers de la qualité de nos produits et nous croyons en le service fiable. Nous vous suggérons de lire ce manuel d’utilisation avant de brancher vontre nouvel appareil car il contient des informations importantes sur l’utilisation, la sécurité, le dépannage at la maintenance, afin d’assurer la fiabilité at la longévité de votre appareil. Visitez www.Danby.com pour accéder aux outils d’autoservice, aux FAQ et bien plus encore.
Consignes de sécurité importantes LIRE ET SUIVRE TOUTES LES INSTRUCTIONS DE SÉCURITÉ CONDITIONS ÉLECTRIQUES • • • • • • • • • • • • • • • • Cet appareil doit être mis à la terre. Branchez le seulement dans une prise correctement mise à la terre. Ne faites pas fonctionner cet appareil s’il a un cordon ou fiche électrique endommagé ou si l’appareil a été endommagé ou échappé. N’épissez pas le cordon électrique.
Consignes de sécurité importantes LIRE ET SUIVRE TOUTES LES INSTRUCTIONS DE SÉCURITÉ POUR VOTRE SÉCURITÉ • • • • • • • • • • • • • Il faut deux personnes ou plus pour déplacer le refroidisseur de vin. Retirez les emballages intérieur et extérieur avant l’installation.
Consignes d’installation CARACTÉRISTIQUES 1. Affichage et Controls Électroniques : Affichage et rélage de la température du centre au breuvages. 2. Verrou à l’épreuve des enfants 3. Interrupteur à Bascule : Manuellement illuminer ou éteignez les lumières intérieures tandis que les portes restent fermées. 4. Portes en Verre Trempé : Teinté pour protéger contre les rayons UV tout en permettant de voir facilement le contenu du cabinet. 5. Tablette avec garniture en acier inoxydable 6.
Consignes d’utilisation PANNEAU DE COMMANDE 1. Activation : Le voyant s’allume pour indiquer que le cycle de refroidissement est presentment en marche. 2. Réglage de l’affichage de la température: L’écran d’affichage indique le réglage de la température. 3. Affichage de la température de l’armoire: L’écran affiche la température actuelle de l’armoire. 4. C°/F° : Le voyant situés à côté, dénote quelle balance de la température est montrée. 5.
Consignes d’utilisation ENTREPOSAGE DES BOISSONS La capacité optimale est de 124 cannettes (de 350 ml) ou 88 cannettes et 7 bouteilles de vin (de 750 ml). ÉTAGÈRES Pour enlever une tablette de la position verrouillée, incline l’étagère comme montré dans la figue A et tire à l’extérieur. Pour réinstaller, assurez l’étagère se repose sur les supports et poussée la tablette vers l’intérieur jusqu’à ce qu’elle soit verrouillée en place. Note : Le support de vin n’est pas fixées en place (verrouillée en place).
Consignes d’utilisation RENVERSEMENT DE LA PORTE Outils requis: • Tournevis Phillips #2 • Clé ajustable 1. Ôtez les cache-vis et dévissez le cache décoratif. Fig. A 2. Tout en maintenant fermement la porte en place, desserrez puis ôtez la charnière supérieure, soulevez puis enlevez la porte. Fig. B 3. Dévissez la charnière inférieure. (8) 4. Ôtez le long pied de l’armoire (9) situé sur le côté gauche, puis faites-le passer sur le côté droit. Fig. C 5.
Soins et entretien NETTOYAGE Comment nettoyer l’intérieur : • Parois, plancher, intérieur de la visière et tablettes - Cetraines éclaboussures d’eau et poussières peuvent être essuyées avec des essuie-tout. D’autres taches peuvent nécessiter un linge humide. Comment nettoyer l’extérieur : • Extérieur de l’armoire - Il est important de garder la région de scellement de la porte sur l’armoire propre. Nettoyez avec un tissu savonneux, rincez le région et puis séchez.
Dépannage De temps en temps, un problème est mineur et un appel de service peut ne pas être nécessaire. Utilisez ce guide de dépannage pour trouver une solution possible. Si l’unité continue de fonctionner incorrectement, appelez un dépôt de service autorisé ou le numéro sans frais pour obtenir de l’assistance. Tel : 1-800-263-2629.
GARANTIE SURWARRANTY LIMITED IN-HOMELIMITÉE APPLIANCE ÉLECTROMÉNAGER This quality product is warranted toAPPAREIL be free from manufacturer’s defects in material and workmanship, providedÀthatDOMICILE the unit is used under the normal operating conditions intended by the manufacturer.
Bienvenido Bienvenido a la familia Danby. Estamos orgullosos de nuestros productos de alta calidad y creemos en el servicio confiable. Usted lo podrá apreciar en este manual fácil de usar, y lo escuchará enlas voces amistosas de nuestro departamento de servicio al consumidor. Sobre todo, usted apreciará estas ventajas cada vez que use su unidad. Eso es importante, ya que su nuevo artefacto formará parte de su familia por mucho tiempo.
Informacion de Seguridad Importante LEA Y SIGA TODAS LAS INSTRUCCIONES DE SEGURIDAD REQUISITOS ELÉCTRICOS • • • • • • • • • • • • • • • • • Este aparato debe estar conectado a tierra. Conecte sólo a una toma de corriente con conexión a tierra adecuada. No utilice este aparato si tiene un cable de alimentación o enchufe dañado o si el aparato ha sido dañado o caído. Nunca permita que los niños operen, jueguen o se arrastren dentro del aparato. Nunca limpie las partes del aparato con líquidos inflamables.
Informacion de Seguridad Importante LEA Y SIGA TODAS LAS INSTRUCCIONES DE SEGURIDAD POR TU SEGURIDAD • • • • • • • • • • • • Se deben utilizar dos personas al mover el enfriador de vino. Retire el embalaje interior y exterior antes de la instalación. Antes de conectar el aparato a una fuente de alimentación, deje reposar durante aproximadamente 4 horas; Esto reducirá la posibilidad de un mal funcionamiento en el sistema de enfriamiento debido a la manipulación durante el transporte.
Instrucciones de instalación CARACTERISTICAS 1. Pantalla y controles electrónicos: Para ver y regular la temperatura del centro de bebidas. 2. Cerradura de prueba de niño con llave 3. Interruptor de Interruptor de Luz Interior: Para iluminar o apagar manualmente las luces interiores mientras la puerta permanece cerrada. 4. Puerta de vidrio templado: Teñido para la protección ULTRAVIOLETA mientras que todavía permite la visión interior fácil. 5. Estantería de acero inoxidable 6.
Instrucciones de operación PANEL DE CONTROL 1. Run: La luz indicadora se ilumina para indicar que el modo de enfriamiento está funcionando. 2. Ajuste de la visualización de la temperatura: La pantalla muestra la configuración de la temperatura. 3. Pantalla de temperatura del gabinete: La pantalla muestra la temperatura actual del gabinete. 4. °C / °F: La luz indicadora adyacente indica la escala de temperatura que se muestra. 5.
Instrucciones de operación ALMACENAMIENTO DE BEBIDAS La capacidad máxima de esta unidad es de 124 (350 ml) latas o 88 latas y 7 (750 ml) botellas de vino. ESTANTERÍA Para quitar un estante de su posición bloqueada, incline el estante como se muestra en la Fig. A y tire hacia afuera. Para volver a instalar, asegúrese de que el estante esté descansando firmemente en los soportes de soporte y empuje el estante hacia dentro hasta que encaje en su lugar.
Instrucciones de operación REVERSIÓN DE LA PUERTA Herramientas necesarias: • Destornillador Phillips # 2 • Llave ajustable 1. Tire de las tapas del tornillo y desatornille la cubierta decorativa. Fig. A 2. Mientras sostiene firmemente la puerta, afloje y retire la bisagra superior, levante y retire la puerta. Fig. B 3. Desenrosque la bisagra inferior. (8) 4. Quite la pierna larga del armario (9) en el lado izquierdo y desplácela hacia el lado derecho.Fig. C 5.
Cuidado y mantenimiento LIMPIEZA Limpieza interior: • Paredes, piso, ventana interior y estantes - Algunos depósitos de agua y polvo se pueden quitar con una toalla de papel seca, otros pueden requerir un paño húmedo. Limpieza del exterior: • Caso exterior - Es importante mantener el área limpia donde la puerta sella contra el gabinete. Limpie esta área con un paño jabonoso. Enjuague con un paño húmedo y deje secar. • Panel de Control y Puerta - Limpie con un paño húmedo y seque completamente.
Solución de problemas Ocasionalmente, un problema es menor y una llamada de servicio puede no ser necesaria. Utilice esta guía de solución de problemas para obtener una posible solución. Si la unidad continúa funcionando incorrectamente, llame a un centro de servicio autorizado oa nuestro número gratuito 1-800-263-2629 para obtener ayuda.
GARANTÍA LIMITADA PARA LIMITED IN-HOME APPLIANCE WARRANTY ELECTRODOMÉSTICO This quality product is warranted to be free from manufacturer’s defects in material and workmanship, provided that the unit is used under the normal operating conditions intended by the manufacturer. Este producto de calidad está garantizado contra defectos de fabricación, incluyendo partes y mano de obra, siempre y cuando laThis unidad seisutilice de funcionamiento paraLimited las que fue diseñado.
All repair parts are available for purchase or special order when you visit your nearest service depot. To request service and/or the location of the service depot nearest you, call the TOLL FREE number. When requesting service or ordering parts, always provide the following information: • Product Type • Model Number • Part Number • Part Description Toutes les pièces de rechange ou commandes spéciales sont disponibles à votre centre de service régional autorisé.