Electric Wall Oven Model: EB-67ERCD9-11BC54T Dalxo User Instructions Thank you for purchasing Dalxo Single Wall Oven, please read the instruction carefully and obey all safety messages. If you have any questions, please do not hesitate to contact our service team: support@dalxo.
Table of Contents Important Safety Instructions............................................................................................3 Instruction............................................................................................................................5 Parts List..............................................................................................................................6 Wall Oven Installation.........................................................................
IMPORTANT SAFETY INSTRUCTIONS WARNING: To reduce the risk of fire, electrical shock, injury to persons, or damage when using the oven, follow basic precautions, including the following: ■ Proper Installation – Be sure the oven is properly installed and grounded by a qualified technician. ■ Never Use the Oven for Warming or Heating the Room. ■ Do Not Leave Children Alone – Children should not be left alone or unattended in area where oven is in use.
The following items are potentially dangerous and appropriate measures must be taken to keep children and the disabled out of the reach: Controls and general appliances; Package, such as bags, polystyrene, nails, etc; Electrical appliances when they are no longer in use, especially potentially hazardous parts. Warning: Accessible parts become hot during use. To avoid burns and scalds, keep children away.
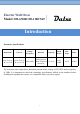
Electric Wall Oven Model: EB-67ERCD9-11BC54T Introduction Parameter Specifications Dimensions Cut Out 23.4’’L*23.4” W’’*21.5’’H 22.05’’L*23.19 W’’*21.65’’H Voltage/ Frequency Material Capacity Rated Power Max Temp Timer 220V/60Hz Stainless Steel finish+Tempered Glass door 2.6 cu. ft 27003220W 440℉ 24 Hrs The oven runs on a single-phase alternating current with a voltage of 220-240V and a frequency of 50Hz.
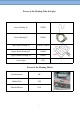
Parts List Parts Number Tray 1pcs Large Grill 1pcs Small Grill 1pcs Rotisserie Fork 1pcs Pull Handle 1pcs Manual 1pcs Picture 6
Power of the Heating Tube & Light Lower Heating El. 1200W Circle Heating El. 2100W Total Upper Heating El. 1000W+1900W Upper Inside Heating El. 1900W Upper Outside Heating El.
A qualified electrician must be contacted in the following cases: Install according to the instructions; When you are unsure about operating the equipment; The power socket needs to be replaced when it is not compatible with the electrical plug.
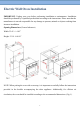
Electric Wall Oven Installation IMPORTANT: Unplug your oven before performing installation or maintenance. Installation should be performed by a qualified professional according to the instructions. Please note that the manufacturer is not take responsible for any damage to persons, animals or objects resulting from incorrect installation. Opening Dimensions (General tolerance) Width: 22.05 +/- 0.05” Height: 23.19 +0-0.
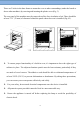
There are 2 holes in the door frame to mount the oven to other surroundings (under the bench or above other machines) by screwing and inserting the plastic cover (Fig. 3). The rear panel of the machine must be removed to allow free circulation of air. There should be at least 2.76” (70 mm) of clearance behind the panel where the oven is installed (Fig.4-5). To ensure proper functionality of a built-in oven, it's important to have the right type of cabinets in place.
Connection to the Mains Supply Devices must be connected according to current rules. It is recommended to be wired by a professional electrician. This equipment must be grounded. Check that the rated power of the power supply and outlet match the max wattage indicated on the nameplate. Additionally, it's crucial to make sure that you connect your appliance correctly by inserting the plug into a socket with a third contact point for grounding.
IMPORTANT The power cord should be placed 120°F (50°C) below the ambient temperature. Safety can only be ensured if it is properly connected to a valid grounded power source in accordance with electrical safety regulations. The manufacturer is not responsible for any damage to persons or objects due to lack of a ground connection. If a gas stove needs to be installed above the wall oven, the distance between them should be > 1.58”.
Clean the glass and other parts using a damp microfiber cloth, a clean sponge, or a hot water solution with a small amount of detergent. Dry everything with a soft cloth. Disassemble/Assemble the Oven Door To make it easier to clean the oven, the oven door can be removed as below steps: Open the door completely and lift the 2 levers “B” (Fig.11); Shut the door slightly, you can lift it out by pulling out the hooks “A” to reassemble the door. (Fig.
Use the Rotisserie In the icon " " of the function panel, the rotisserie can be used in combination with the rack. After fitting the food on to the spit “S”, block it with the two forks “F”. then proceed as follows: The common oven installation method is as shown below, but this product is suitable for Fig.13; And Fig.14 is just for extra reference. Fit the end of the spit into the motor “M” at the back of the oven (Fig. 13). Fit the support into the circular groove in the spit.
How to use 15
Operation 1.Power Switch To turn on/off the display panel. Show current time when turn on the display. 2.Function Switch Press it to choose different function. When you switch to a new function, the current function will stop and the cooking time must be reset.
Cook Food with 11 Options About the Icon Note: the inverted triangle represents the inside heating tube on the top 17
Defrost The air at ambient temperature is distributed inside the oven for defrosting food more quickly and without proteins adulteration. Broil+Rotisserie (All Upper heating element or Rotisserie ). You can rotisserie the food in the broil function. Always broil with the door closed. In this mode, all upper heating element are working Broil+Rotisserie (Upper inside heating element or Rotisserie ). You can rotisserie the food in the broil function. Always broil with the door closed.
Pizza Function Similar to Bake, but the air is circulated from a fan at the back of the oven that cycles on and off. All types of pizza- fresh, frozen, prebaked crust and ready-to-bake. Convection Broil Ideal for dishes that require top heat, such as rice pudding or cauliflower cheese because the heat is not as fierce as a grill. True Convection+Hot Air Economy This feature allows you to use the whole grill or just part of them for economical grilling in small quantities. 3.
4.Time Switch ·Press switch for 3S to set current time. Adjust time number by pressing . Press to confirm setting. ·Alarm setting: Press switch until number by pressing keep flashing. Display will show”0:00”. Adjust time , then press to confirm setting. Set time back to “0:00” to cancel alarm. ·Set the cooking time: Press switch until display show “ Duration” and “ END ”. Adjust time number by pressing , then press to confirm setting. Start working time = End time – Duration time 5.
Replace the Light (Fig.15) Unplug your oven; Unscrew the glass cover attached to the lamp holder; Unscrew the lamp and replace it with high-temperature one, around 572℉ (300℃ ). Remount the glass cover and reconnect the appliance to the power supply. WARNING: Ensure that the appliance is unplugged before replacing the lamp to avoid the possibility of electric shock.
Cleaning & Maintenance IMPORTANT: This appliance is only for household use, don’t use it outdoors! Important: Unplug your oven before cleaning or maintenance. To extend the life of your oven, it must be cleaned regularly as follows: Do not use steam equipment to clean the appliance. To protect against the risk of electrical shock, do not immerse the unit, cord or plug in liquid or sprinkle water to clean the appliance. Don’t clean the appliance when it is still hot.
Troubleshooting Before calling service team for support, please check the following troubleshooting tips: Cause Reason Solution Not enough heat from the bottom. Use the natural convection position; Use deeper cake tins; Lower the temp; Put the cake on a lower rack. The lower part is dark but the upper crust too pale Excessive heat from the bottom.. Use the natural convection position; Use lower side tins; Lower the temp; Put the cake on a higher rack.
Warranty This warranty applies to products sold by Dalxo in the U.S. It expressly applies to a single product only. Dalxo products come with a one-year warranty from the date of purchase against defects in material and workmanship. Please keep your receipt, as proof of purchase will be necessary to make a warranty claim. Within this warranty period, we may offer repairs, refunds, or replacements at our discretion.
Every implied warranty, including any statutory warranty of merchantability or fitness for a particular purpose is disclaimed except to the extent prohibited by law, in which case such warranty is limited to the duration of this written warranty. This warranty gives you specific legal rights. You may have other legal rights that vary depending on where you live.