
User`s manual


Genie HM Series-GigE Vision Camera Installing the Genie Camera • 31
• Wait for the GigE Server to find the Genie again, then run CamExpert to test the Genie operation (as described
below).
Important: If the Genie power is accidentally cut off during the firmware update (such as a electrical source
power failure or human error), the Genie is easily recovered. See "
Power Failure During a Firmware Update–Now
What?" on page 140.
Quick Test with CamExpert
When the Genie camera is directly connected to a Gigabit network adapter on a host computer or via a network
switch, testing the installation with CamExpert is a straightforward procedure.
• Start Sapera CamExpert by double clicking the desktop icon created during the Genie software installation.
• CamExpert will search for installed Sapera devices. In the Device list area on the left side, the connected Genie
camera is shown or will be listed in a few seconds after CamExpert completes the automatic device search
(device discovery).
• Select the Genie camera device by clicking on the camera user-defined name. By default the Genie camera is
identified by its serial number. The Genie status LED will turn green, indicating the CamExpert application is
now connected.
• Click on the Grab button for live acquisition (the Genie default is Free Running mode). Focus and adjust the
lens iris. See "
Operational Reference" on page 35 for information on CamExpert parameters with the Genie
camera.
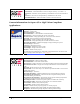
• The following figure shows CamExpert with the Genie generating a diagonal test pattern. Select this via the
Test Image Selector drop menu from the Sensor Parameters tab.