
User Guide

I
N
S
T
A
L
L
A
T
I
O
N
&
O
P
E
R
A
T
I
O
N
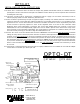
The OPTO-DT has two sets of terminal strips which are used when installing the OPTO-DT for operation. The first set is
used for the connections to the relay contacts and the 12 volt regulated DC input power. With the relay positioned to
the left of the circuit board and the green LED at the lower right corner, the connections to the left terminal strips are as
follows:
Upper terminal #4 and Lower #1
Normally open contact -> when relay activates this contact is connected to the common contact
Upper terminal #3 and Lower #2
Common contact
Upper terminal #2 and Lower #3
Normally closed contact -> this contact is connected to common,
except when the relay is acivated, the contact is disconnected
Upper terminal #1 : ( + ) connection from the 12 volt DC power
Lower terminal #4 : ( - ) connection from the 12 volt DC power
Note: Reverse polarity of the 12 volt DC input power or not using 12 volt regulated DC will damage the
OPTO-DT and will not be warranted for consequential damage. All connections should be done with the
power OFF and all wires should not be stripped longer than 1/8" so as not to allow shorting to occur to
the circuit board tracks at the barrier strips on the printed circuit board
The second set of terminal strips, to the right, are used to connect the input sets (optical coupler). The lower right strip is
for the detectors (clear). The copper wire of the detector connects to terminal #1 and the silver wire connects to #4. In
the multiple version the copper wires from the second and third detectors connect to #2 and #3. All silver wires from
the detectors connect to terminal #4.
The upper right strip is for the emitters (black). The copper wire of the emitter connects to terminal #1 and the silver wire
connects to terminal #4. In the multiple version the emitters must be connected in series. The copper wire of the first
emitter connects to terminal #1, silver wire connects to the copper of the second emitter (#2), whose silver then
connects to the copper of the third emitter(#3). The silver wire of the last emitter always connects to terminal #4.
These series connections can be made at the #2 and #3 terminals as indicated above or directly, wire to wire, at the
layout location.
The emitter/detector devices are supplied, mounted on brackets, with wires attached. When attaching these brackets to
the layout please use screws and
care
so as to minimize vibration to the devices. To extend the distance between the
emitter and detector it will be necessary to lengthen the wires. When extending these wires it is absolutely essential
that the polarity of the connections from the emitter/detector devices to the OPTO-DT board be maintained. If the
polarity is reversed the optical devices will be damaged. It is suggested that when possible only the emitter wires be
extended. If you must extend the detector wires, do so sparingly as extra wire length may reduce the sensitivity of the
detector. As a further aid in extending the optical range a hood or shield can be installed on the detector. A short length
of tubing, heatshrink is ideal, makes an excellent hood.
After mounting the optical devices and making all electrical connections to the OPTO-DT board it is time to power up and
check the alignment of the optical path. When the alignment is correct the small green LED in the lower right corner of
the board will illuminate. Alignment is accomplished mechanically by bending and rotating the mount brackets. The
further apart the optical devices are mounted the more critical precise alignment becomes. Take your time and have
patience.
The multiple input version of the OPTO-DT has a block of four small rocker type switches which are used to change
functions. Switches #1, #2 and #3 are for selecting and aligning the optical sets. If you are using less than three optical
sets with this OPTO-DT, the switch for the unused set must be in the open position. For adjustment of alignment, turn
the selected switch to the closed position and leave the other two switches open. This will allow each of the optical sets
to be independently selected for alignment. When alignment has been completed, return the switches for the optical
sets to their closed positions which is the normal position for operation.
Rocker switch #4 is used to determine which time function is to be selected. When switch #4 is closed the NORMAL
function is operational. In NORMAL function, the relay is activated when the optical path is interupted and relaxed when
the optical path is restored. There is a time adjustment potentiometer located above the relay, adjacent to upper left
terminal #1. Full counter clockwise rotation of this potentiometer corresponds to minimum (momentary) time setting.
Rotating clockwise will increase the time setting to a maximum of about 60 seconds. With the OPTO-DT in NORMAL
function, this time setting establishes a minimum on time for the relay i.e., when the optical beam is interupted the relay
is activated for the minimum time or for the duration of the interuption, which ever is LONGER. If switch #4 is open the
TIMER function is selected. In TIMER function, when the optical path is interupted, the relay is activated for the set time
period and then is relaxed. The relay WILL NOT ACTIVATE AGAIN until the optical path is restored which will allow the
circuit to reset.
The OPTO-DT with only one input set has a jumper bar in place of switch #4. NORMAL is selected when the jumper is
closed while an open jumper sets TIMER function.
DO NOT
place this jumper across the other connector!
The output relay of the OPTO-DT is of Double Pole Double Throw configuration with contacts rated at 5 Amps. There
may be situations where you may desire to have additional relay contacts available. At the left edge of the OPTO-DT
board, just above the lower left terminal strip, there is a two pin connector. This connector allows a second relay (Item
#555) to be operated by the OPTO-DT. This 'piggy back' relay is furnished on a mounting board with terminal strips and
is wired with the correct plug to make the connection to the OPTO-DT.
W
h
e
n
p
o
w
e
r
i
s
f
i
r
s
t
a
p
p
l
i
e
d
t
o
t
h
e
O
P
T
O
-
D
T
t
h
e
r
e
l
a
y
w
i
l
l
e
n
e
r
g
i
z
e
f
o
r
t
h
e
d
u
r
a
t
i
o
n
o
f
t
h
e
s
e
l
e
c
t
e
d
t
i
m
e
c
y
c
l
e
.