
User Guide
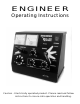

EMERGENCY and rotate all controls
to their full counter-clockwise position.
Connect the power cord to a
grounded household line outlet
(110-120 VAC) and push the top part
of the power switch. The green lamp
should illuminate. If it does not, check
the power cord and plug, the outlet
receptacle and the household line
circuit. With power on the ENGINEER,
the first step is to adjust the pulse
circuit to match the motor in the
locomotive selected.
1) Check - - - brake in
EMERGENCY and all
controls full
counter-clockwise.
2) Release brake and rotate
pulse control clockwise until
locomotive just begins to
creep. If pulse is set too high
the motor will be noisy. It
may be necessary to
increase the SPEED control
very slightly in order to get
the pulses to turn on.
3) Set both throttle and brake
response to about 9 or 10
o'clock to provide some
momentum delay.
4) Increase speed control
clockwise - - - acceleration
should be smooth. Set
speed control at 12 o'clock
and let speed increase.
5) Make a service brake
application to a full stop and
watch for a smooth
deceleration. Watch meters
for evidence of pulses as
stop is approached.
6) Release brake and watch
start again.
7) Brake again to a full stop.
8) If the start and stop are
sudden the pulses are
probably set too low. If the
start and stop are jerky or
the motor is noisy the pulses
are set too high and should
be lowered. (Note: 3 pole
motors will always be
somewhat jerky in operation
as compared to a 5 or 7
pole motor) Also, some
mechanisms just are not
smooth enough to
appreciate the full effect of
the pulse circuit.
9) Fine adjust the pulses until
you are satisfied with the
smoothness of operation.
10) Pulse settings will vary from
locomotive to locomotive
because of differences in
motor and gear tolerances,
however these settings are
unique and should be
repeatable every time a
specific locomotive is run.
With the pulses adjusted to match the
locomotive, lets practice actual
operation. Initially we will operate just
the locomotive so the response
settings (both throttle and brake)
should be at or close to minimum. Try
about 9 o'clock for now. Let the
speed control remain at the 12 o'clock
position. With the reverse switch in
the forward position we should be
ready to proceed. Release the brakes
and lets move on down the track.
Note that the start is smooth and
acceleration is gradual up to the
speed selected. Check the voltmeter
and see what voltage is actually
reached at this setting. Change the
speed control to a higher setting and
watch as the voltage and speed
increase. To slow down we have two
choices. We can lower the speed
control or we can apply the brakes.
Leave the speed control set at about
3 o'clock which should be around 12
volts (15 volts on the GAUGE-1). Shift
the brake switch to SERVICE. Voltage
will immediately reduce at whatever
brake response is set and the
4