
User Guide


A
m
e
r
i
c
a
n
M
o
d
e
l
s
G
G
-
1
L
o
c
o
M
a
t
i
c
™
T
y
p
e
3
I
n
s
t
a
l
l
a
t
i
o
n
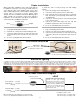
change motor mout to
1/16" thick tape.
Single Speaker
mounting template.
Double Speaker
mounting template.
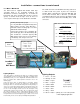
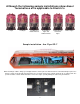
To mount sound unit you must remove the 1/8" double
sided tape and mount board flush to the roof top. Also
remove the one 2200mfd capacitor, as shown, to obtain
clearance for the drive box stud (or remove the stud).
Study the pictures for wire, lamps, sw/vol, and speaker
placement.
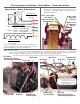
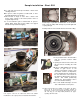
Headlights were mounted using a brass tube as a shroud.
The sw/vol board was mounted with double sided tape
placed on the front side of the board and then made
black with a marker. Carefully fold the gray flat wire to fit.
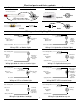
Use the cutout templates below for speaker mounting. Copy
them and glue onto a stiff cardboard. Cut out the speaker
circles. Fold on the gray line. Mount the speakers with a glue.
Secure the entire unit inside the shell completely sealing the
edges as shown. Hot Melt was used for the installation.
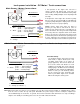
When installing four
1.5" speakers (item
#661) wire in series
parallel as shown in
the speaker insert.
For two 1.5" speakers,
wire them in series.
Observe the speaker
polarity in all cases!
12