
User's Manual


17
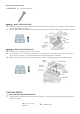
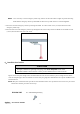
8.1A Center the door bracket on the previously marked vertical centerline used for the header bracket installation.
Note correct UP placement, as stamped inside the bracket.
8.2A Position the top edge of the bracket 2"-4" (5-10 cm) below the top edge of the door, OR directly below any
structural support across the top of the door.
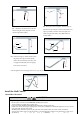
8.3A Mark, drill holes and install as follows, depending on your door’s construction:
Metal or light weight doors using a vertical angle iron brace between the door panel support and the door bracket:
· Drill 3/16" fastening holes. Secure the door bracket using the two self-threading screws (H16). (Figure 2)
· Alternately, use two 5/16" bolts, lock washers and nuts (not provided). (Figure 3)
Metal, insulated or light weight factory reinforced doors:
· Drill 3/16" fastening holes. Secure the door bracket using the self-threading screws (H16). (Figure 4)
Wood Doors:
· Use top and bottom or side to side door bracket holes. Drill 5/16" holes through
the door and secure bracket with
5/16"x2" carriage bolts, lock washers and nuts
(not provided). (Figure 5)
NOTE:
The 1/4"-14x5/8" self-threading screws are not intended for use on wood
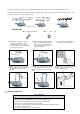
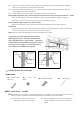
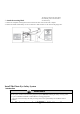
9、Connect the door arm to the trolly
HARDWARE
Option SECTIONAL DOORS
NOTE
:If the holes in the curved door arm and the straight door arm do not align, reverse the
straight door arm, select two
holes (as far apart as possible) and attach using bolts (H15), nuts (H20), and lock washers (H21).
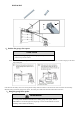
A horizontal and vertical reinforcement is needed for
lightweight garage doors (fiberglass, aluminum, steel,
doors with glass panel, etc.) (not provided). A horizontal
reinforcement brace should be long enough to be secured to
two or three vertical supports. A vertical reinforcement
brace should cover the height of the top panel.
Vertical
Reinforceme
nt
Vertical Centerline
of Garage Door
H8
Vertical
Reinforcement
Vertical Centerline
of Garage Door
Bolt 5/16"
Nut 5/16"
(not provided)
H2 Clevis Pin,short
Φ8×30 (2)
H5 CotterΦ2×25(2)
H3 Hex
N
ut
M8(2)
H4
Hex Bolt M8×20(4)
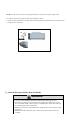
9.1 Close the door. Disconnect the rolley by
pulling the emergency release handle.
9.2 Attach the straight door arm to the outer trolley using
the clevis pin (H14). Attach with the ring fastener
(H19).
Door Bracket
Door Bracket