
User manual


36 |
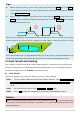
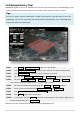
4.6 Photogrammetry Tool
Photogrammetry tool is for the user who wants to create the professional maps by aerial photography easily.
In order to do that, you just need to setup the servo action and mission path correctly as follows.
Tips:
This tool is actually a functions combination. It simplifies the parameters setup procedure for the aerial
photography. You can still setup all the tools introduced before individually for your aerial photography,
however that will be very complicated.
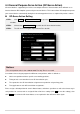
STEP1: Click ToolBox Photogrammetry Tool to open the setup window.
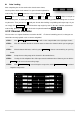
STEP2: Click Config the shooting action to setup the servo action for the camera shooting action.
STEP3: Click Reference Photo to see if your camera is working as you want.
STEP4: Fill in the right Focal Length, Sensor Height, and Sensor Width according to your camera.
STEP5: Fill in the Fly Height, H Overlap and W Overlap as you like. H Overlap and W Overlap
represent the overlap percentage across the sensor height and width.
STEP6: Fill in the flight horizontal and vertical speed in H Speed and V Speed separately.
STEP7: Choose your turning mode between Adaptive_Bank_Turn and Stop and Turn.
STEP8: Click Click to draw a region which you want to scan to choose an area.
STEP9: Click Preview to preview the mission plan.
STEP10: If everything is OK, click Generate to generate all the waypoints. Now you will a flight mission
generated automatically in the Mission Editor.
Follow the procedure mentioned before to finish your aerial photography task.