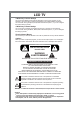
LCD Display & TV Operating Instructions
LCD TV A Wide Array of Screen Settings You can choose different screen settings depending on the type of program you are watching or the surrounding conditions (the lighting or the outside weather conditions). You can switch among the Sport, Movie, Music and Normal options , or you can configure the screen settings yourself. A Wide Array of Sound Settings You can choose an optimal sound setting for the type of program you are watching.
ENGLISH Important Safety Instructions The unit should not be placed in a built-in installation such as a book-case, limited space rack unless proper ventilation is provided. - This may cause fire by overheating or damage the unit by falling. Do not use the unit near water, oil or inflammables. - This may cause a fire. Do not use the unit in direct sunlight and keep it away from heaters, stoves, and other sources of heat. - This may cause a fire.
Important Safety Instructions Do not use or store inflammable substances near the unit - This may cause an explosion or fire. Place the unit away from the wall for well ventilation. - This may cause a fire. Place the antenna away from the electric wire, not to touch even though it falls down by wind. - This may cause an electric shock. Be sure to plug in tightly and hold the plug, not the cord when disconnecting the plug from the wall outlet. - This may cause a fire.
ENGLISH Table of Contents Important Safety Instructions . . . . . . . . . . . . . . . . . . . . . . . . . . . . . . . . . . . . . . . . 3 Unpacking your TV . . . . . . . . . . . . . . . . . . . . . . . . . . . . . . . . . . . . . . . . . . . . . . 6 Viewing the Control Panels (Front View) . . . . . . . . . . . . . . . . . . . . . . . . . . . . . . . . . . 7 Viewing the Control Panels (Rear View) . . . . . . . . . . . . . . . . . . . . . . . . . . . . . . . . . . 8 Remote Control . . . . . . . . . . . . . .
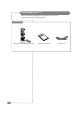
Unpacking your TV Please make sure the following items are included with your TV set. If any items are missing, contact your dealer.
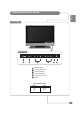
ENGLISH Viewing the Control Panels Front View Bottom Side 1 3 2 1 2 3 4 5 6 4 5 6 MENU selection Input TV/AV selection Channel selection Volume adjustment Remote control sensor Power Power Indicator Status Indicator Status Red Stand-by Green Power on 7
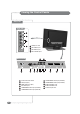
Viewing the Control Panels Rear View Right Side 1 2 3 4 1 2 3 4 Headphone Jack AV2 VIDEO Input AV2 AUDIO Input AV2 S-VIDEO Input Bottom Side 1 1 2 3 4 5 6 8 2 3 4 LCD - 32” 7 8 5 6 Power Inlet with Switch DVI Input (PC) RGB Video Input (PC) PC Audio Input COMPONENT1 Video Input (DTV/DVD) COMPONENT1 Audio Input (DTV/DVD) 7 8 9 10 11 9 10 11 COMPONENT2 Video Input (DTV/DVD) COMPONENT2 Audio Input (DTV/DVD) EURO-SCART1 Jack EURO-SCART2 Jack Antenna Input Jack
ENGLISH Viewing the Control Panels Rear View Right Side 1 2 3 1 2 3 4 4 Headphone Jack AV2 VIDEO Input AV2 AUDIO Input AV2 S-VIDEO Input Bottom Side 1 2 1 2 3 4 5 6 7 3 4 7 8 5 6 Power Inlet with Switch DVI Input (PC) RGB Video Input (PC) PC Audio Input COMPONENT1 Video Input (DTV/DVD) COMPONENT1 Audio Input (DTV/DVD) COMPONENT2 Video Input (DTV/DVD) LCD - 37” / 42” 9 8 9 10 11 12 13 10 11 12 13 COMPONENT2 Audio Input (DTV/DVD) EURO-SCART1 Jack EURO-SCART2 Jack RS-232C (For Service
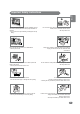
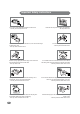
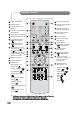
Remote Control 1 Power On/Off Button 1 2 Numeric Buttons 13 3 One/Two-Digit Channel Selection 4 Favorite Channel Selection (See page 28) 7 Picture Mode Selection ( ) (See page 18) 8 Sound Mode Selection ( ) (See page 19) 9 Control the Cursor in the OSD Menu ( ) and ( ) (Channel Up / Down) (Teletext Page Up / Down, Page 33) and (Volume Up / Down) 2 16 Picture Size Selection (See page 31) 3 17 Previous Channel 15 18 TV Information Display (See page 25) 16 6 18 20 Fastext Functions : (See page
Inserting Batteries in the Remote Control ENGLISH You must insert or replace the batteries in the remote control when you purchase the TV or when you find that the remote control is no longer operating correctly. 1 Insert two AAA-size batteries (supplied) by matching the + and - on the batteries to the diagram inside the battery compartment. ■ Handle the remote control with care; avoid dropping it, getting it wet, placing it direct sunlight, near a heater, or where the humidity is high .
Connecting to the RCA or S-Video Input ( Side AV2 ) Right Side of the TV (A) For RCA Input VCR Camcorder (B) For S-Video Input Video game device (A) For RCA Input 1. Connect the RCA cable to the input jacks (video+ audio L/R of side AV2) on the TV and output jacks on the external equipment such as a VCR, camcorder and some video game devices. (B) For S-Video Input 1.
ENGLISH Connecting to a DVD or DTV Set-Top Box INPUT (RCA or DVI) Rear of the TV Video Cable DVD/DTV STB Audio Cable OR DVI Cable 1. Connect the video cables to the Y, Pb, Pr input jacks (COMPONENT1 or 2) on the TV and the Y, Pb, Pr output jacks on the DVD or DTV Set-Top Box. 2. Connect the audio cables to the Audio L/R input jacks (COMPONENT1 or 2) on the TV and the Audio output jacks on the DVD or DTV Set-Top Box. 1.
Connecting the Headphones Right Side of the TV You can connect a set of headphones to your TV if you wish to watch a program without disturbing the other people. (See page 20) 1. Plug a set of headphones into the 3.5mm mini-jack socket on the right side of your TV. You can be heard the sound through the headphones. Note : If you use headphones for long period of time at a high volume, you may damage your hearing. Headphones are not included.
ENGLISH Connecting the Power Cord and Switching the TV On / Off 1 Connect the power cord for your TV to the power inlet on the back of your TV. 2 Plug the power cord for the TV into a nearby outlet, and turn on the power switch on the back of your TV. 3 Press the POWER, CH button on the front panel of your set or press the POWER( ), CHANNEL() button on the remote control. After the green LED lamp switch on and your TV will be turned on. 4 To switch your TV off, press the POWER( ) button again.
Storing Channels in Memory Picture Audio Timer Install Setup Auto Tuning Programme 12 Colour PAL System BG Manual Tuning S23 Fine Tuning Picture :Access Audio 3 Press the ()button to select Auto Tuning, and press the S23 Stereo/Dual1 (¥)button to select the country. Then press the OK button for about 3 seconds.
ENGLISH Storing Channels in Memory 7 Press the ()button to select Manual Tuning and press the OK button. Picture Audio Timer Install Setup Auto Tuning Press the( ) button to select C (broadcast channels) or S (cable channels) and press the channel number with the number (0~9) buttons. Programme 12 Colour PAL System BG Manual Tuning S23 Fine Tuning 217.25 Name ■ Press the (¥)button to increase or decrease the channel by one.
Customizing the Picture Picture Mode Audio Timer Install Setup Option 1 Press the MENU button. 2 Press the (¥) button to select the Picture group and press the OK button. Standard Brightness 050 Contrast 050 Sharpness 007 Colour 050 Tint 050 ■ Temperature ■ :Move OK:Select Picture Mode Audio MENU:Previous EXIT:Exit Timer Standard Install Setup Standard : Select when it is bright around the TV. Sport : Select when you want to get a clearer picture or watch sports.
ENGLISH Customizing the Audio 1 Press the MENU button. 2 Press the (¥) button to select the Audio group and pres the OK button. 3 Press the () button to select Balance and press the OK button. Adjust the sound balance with (¥) or () button you wished. Picture 4 Press the () button to select Volume and press the Audio Timer Install Balance 50 Volume 30 Setup Option Equalizer OK button. Adjust the sound volume with (¥) or () button you wished.
Selecting WOW Surround Select the Wow Surround feature to amplify the mid-to low-range sound or create surround effect. Picture Audio Timer Balance 50 Volume 30 Install Setup Option 1 ■ Equalizer SRS WOW Source Press the () button to select SRS WOW and press the OK button. On Main SRS WOW On The options available in the SRS WOW menu are displayed. 2 Press the () button to On or Off. Off 3 Press the OK button.
ENGLISH Setting the Date & Time 1 Press the MENU button. 2 Press the () button to select Clock and press the (¥) or OK button. 3 Press the (¥) button to move between Date ➔ Month ➔ Year. 4 Press the () or number (0~9) buttons to adjust the Date and repeat the above steps 3-4 to adjust the Month and Year in the same way. ■ You can erase and reset the Date by pressing the OK button. Picture Audio Timer Install Clock Setup Option --:-- Update Pr.
Setting the Preset Time ( On / Off ) This function is available after you set the clock first. Picture Audio Timer Install Clock Setup Option --:---:-- Off Timer --:-- button. On Timer 3 Press the () button to select Enable and press the (¥) On Enable On Time AM - - : - Programme :Position or OK button. Press the (¥) button to select ON or OFF. 01 Volume 020 MENU:Previous EXIT:Exit /OK:Select Press the MENU button.
ENGLISH Setting Restrictions On Button Input 1 Press the MENU button. Picture Audio Timer Install Setup Option Local Lock 2 Press the (¥) button to select the Option group and press Off OSD Setting No Signal Power Off 20 the OK button. No Operation Power Off 180 Noise Reduction On Daitsu Engin 3 Press the () button to select Local Lock and press the OK button. 4 Press the () button to select Off, Once or Always and :Move OK:Select MENU:Previous EXIT:Exit press the OK button.
No Signal Auto Power Off Automatically turns the power off if there is no broadcast signal or button pressed for some time. Picture Audio Timer Install Setup Option Local Lock Off OSD Setting 0:OFF, 1~20 No Signal Power Off 20 1 2 Press the (¥) button to select the Option group and press the OK button. No Operation Power Off 180 Noise Reduction On Daitsu Engin 3 Press the () button to select No Signal Power Off . MENU:Previous EXIT:Exit No Signal Power Off :Adjus Press the MENU button.
ENGLISH Daitsu Engine 1 Press the MENU button. Picture Audio Timer Install Setup Option Local Lock 2 Press the (¥) button to select the Option group and press Off OSD Setting No Signal Power Off 20 the OK button. Daitsu Engin Off 3 Press the () button to select Daitsu Engine and press Low No Operation Power Off 180 Noise Reduction On Daitsu Engin High the OK button.
Adjusting the Screen Geometry This function does not work in DVI-Digital mode. Auto Geometry Adjust 1 Picture Audio Timer Install Setup Option Language English Geometry 2 Press the (¥) button to select the Setup group and press the OK button. Aspect Mode Auto No WSS Full Favorite Channel PIP Adjustmant Press the MENU button. 3 Press the () button to select the Geometry group and press the OK button.
Adjusting the Screen Geometry ENGLISH This function does not work in DVI-Digital mode. Adjusting the Phase 1 Press the MENU button. Picture Audio Timer Install Setup Option Language 2 Press the (¥) button to select the Setup group and press Geometry the OK button. 3 Press the () button to select the Geometry group and English Geometry Auto Geometry Adjust Aspect Mode Auto H. Size 0 No WSS H. Position 50 Favorite Channel V.
Watching your Favorite Channels Chose when deleting the favourite channels registered in the buttons 1 to 5. Picture Audio Timer Install Setup Language Option English 1 Press the MENU button. Geometry Aspect Mode Auto Favorite Channel No WSS 1: ----- Favorite Channel 2: ----- PIP Adjustmant 3: ----- Factory Preset 4: ----- 5: ----- / 0~9:Adjust OK:Select Full 2 Press the (¥) button to select the Setup group and press the OK button.
Display the Picture in Picture ( PIP ) ■ 1 This function is available only with the remote control. You can watch another device's image in the PIP while watching the TV, PC or in VIDEO the main image. ENGLISH ■ Press the PIP( ) button. There are 2 modes of window : PIP, POP Whenever you press this button, PIP window mode will be changed. The PIP window is changed in the following order : PIP➔ POP ➔ Off < PIP > 2 Press the ( the PIP.
Display the Picture in Picture ( PIP ) Changing the PIP Size Picture Audio Timer Install Setup Language Option 1 English Press the ( ■ Geometry Aspect Mode Auto No WSS ) button on the remote control. The PIP will change free different size whenever you press () or (¥) button. Full Favorite Channel PIP Adjustmant PIP Adjustmant H. Position 0 V.
Changing the Picture Size ■ 1 You can change the screen size according to the picture aspect ratio. Choose the optimum one from the following ASPECT modes. The Auto aspect mode is fixed at Full when you are using the TV as a PC screen. Press the ( ENGLISH ■ ) button on the remote control. When you are viewing the Main image: The image will change as shown below whenever you press this button.
Teletext Functions The Teletext page of most TV channels provide information such as TV programme times, News bulletins, Weather forecasts, Travel information, or Sports results. Functions of the teletext A B C Part D E F Display Contents A Selected page number. B Broadcast Station identity. C Current page number or searching status. D Date and time. E Text information. F FASTEXT information.
ENGLISH Selecting a Special Teletext Functions Selecting a Special Teletext Functions MENU REVEAL Functions Displays concealed text such as answer to quiz games. To return to normal viewing, press this button again. SUB-PAGE PAGE UP PAGE DOWN Displays a secondary page by entering its number. Displays the next page. Displays the previous page. HOLD When the secondary pages are displayed in sequence, press the HOLD button. To freeze the current display page, press the HOLD button again to resume.
Connecting to the PC (DVI) DVI INPUT Rear of the TV Rear of the PC Audio Cable (Not Included) DVI Cable (Not Included) ◆ Connect the DVI Cable to the DVI INPUT port on the TV and output port on the Rear of the PC. RGB INPUT Rear of the TV Rear of the PC Audio Cable (Not Included) 15Pin D-Sub Cable ◆ Connect the 15Pin D-Sub Cable to the RGB INPUT port on the TV and output port on the Rear of the PC. To use the TV as a PC Display 1 Turn the PC on.
ENGLISH Setting the PC Software 1 First, click on Settings on the Windows Start menu and click on "Control Panel". 2 Double click on the Display icon. 3 Click on the Settings tab on the display dialog-box. 4 Adjust the resolution up to 1366 x 768 pixels. 5 Click the Advanced button and click the Monitor tab on the dialog-box. Set the vertical-frequency to 60Hz and then click the OK button. ☛ - Maximum resolution depends on the Video Card.
RS-232C Configurations RXD TXD GND PC 2 3 5 TV 2 3 5 RXD TXD GND Serial Link Command Command from host ‘[‘ Ack from monitor ‘]‘ 36 COMMAND (3 byte) ARGUMENT (4 byte) RETURN (4 byte) ‘/n‘ ‘[‘ + ‘SAB’ + ‘000#’ Power on/off control 0=standby, 1=on ‘[‘ + ‘S4A’ + ‘000#’ Main AV Input selsection 1=TV, 2=SCART1/2, 3=AV2, 4=Component1, 5=Component2, 6=DVI ‘[‘ + ‘S4G’ + ‘000#’ PIP AV Input selection 1=TV, 2=SCART1/2, 3=AV2, 4=Component1, 5=Component2, 6=DVI ‘[‘ + ‘S4F’ + ‘0303’
ENGLISH Standard Display Mode If the signal from the system equals the standard signal mode, the screen will adjust automatically. If the signal from the system does not equal the standard signal, adjust the display mode as shown below referring to your video card instructions. Otherwise there will be no picture or only power may turn on. Resolution Horizontal (KHz) Vertical (Hz) Clock Frequency (MHz) Polarity (H/V) 640 x 350 31.469 70.086 25.175 +/- 720 x 400 31.469 70.087 28.
Pin Configuration DVI-D Connector Pin 1 2 3 4 5 6 7 8 9 10 11 12 Signal Assignment Pin Signal Assignment T.M.D.S Data2T.M.D.S Data2+ T.M.D.S Data2/4 Shield T.M.D.S Data4T.M.D.S Data4+ DDC Clock DDC Data No Connect T.M.D.S Data1T.M.D.S Data1+ T.M.D.S Data1/3 Shield T.M.D.S Data3- 13 14 15 16 17 18 19 20 21 22 23 24 T.M.D.S Data3+ +5V Power Ground(for +5V) Hot Plug Detect T.M.D.S Data0T.M.D.S Data0+ T.M.D.S Data0/5 Shield T.M.D.S Data5T.M.D.S Data5+ T.M.D.S Clock Shield T.M.D.S Clock+ T.M.D.
ENGLISH Troubleshooting For TV No picture or sound. ☛ Make sure the TV is plugged in. ☛ Make sure the power cord is connected to the consent correctly. ☛ Check the power failure. Screen is black. ☛ Make sure the external signal source mode is selected. ☛ Press the TV/AV button to change to TV. Picture is OK but there is no sound. ☛ Press the Mute button. ☛ Check another channel. ☛ Press the button to increase the volume. Poor sound quality.
Troubleshooting For Monitor 40 "No signal" message ☛ Check if the signal cable(DVI Cable) is properly connected to the computer. (See page 34) "Out of range" message ☛ This message may appear when the resolution and frequency of the video card in the computer are out the range of the TV. Select the proper resolution and frequency for the TV. (See page 37) Picture rolls down vertically. ☛ Check if the signal cable (DVI Cable) is properly connected to the computer.
ENGLISH Specifications LCD 32 Model name LCD TV/ VIDEO COMPONENT SCART Size 32” Diagonal Display Size 697.64 mm (H) x 392.25 mm (V) Pixel Pitch 0.170 mm (H) x 0.510 mm (V) Pixel Number 1366 x 768 (WXGA) Type a-Si TFT active matrix Brightness 500 cd / m2 Contrast Ratio 600 : 1 Viewing Angle 176 (H) / 176 (V) Colour System PAL / SECAM / AV NTSC Sound System D/K, I, L, L´.M Video System CVBS, S-VHS Y / Pb / Pr COMPONENT1,2 : 480i/p, 576i/p, 720p, 1080i Video Input 1.
Specifications LCD 37 Model name LCD TV/ VIDEO COMPONENT SCART Size 37” Diagonal Display Size 819.6 mm (H) x 460.8 mm (V) Pixel Pitch 0.20 mm (H) x 0.60 mm (V) Pixel Number 1366 x 768 (WXGA) Type a-Si TFT active matrix Brightness 500 cd / m2 Contrast Ratio 600 : 1 Viewing Angle 176 (H) / 176 (V) Colour System PAL / SECAM / AV NTSC Sound System D/K, I, L, L´.M Video System CVBS, S-VHS Y / Pb / Pr COMPONENT1,2 : 480i/p, 576i/p, 720p, 1080i Video Input 1.
ENGLISH Specifications LCD 42 Model name LCD TV/ VIDEO COMPONENT SCART Size 42” Diagonal Display Size 930.25 mm (H) x 523.01 mm (V) Pixel Pitch 0.227 mm (H) x 0.681 mm (V) Pixel Number 1366 x 768 (WXGA) Type a-Si TFT active matrix Brightness 500 cd / m2 Contrast Ratio 500 : 1 Viewing Angle 176 (H) / 176 (V) Colour System PAL / SECAM / AV NTSC Sound System D/K, I, L, L´.M Video System CVBS, S-VHS Y / Pb / Pr COMPONENT1,2 : 480i/p, 576i/p, 720p, 1080i Video Input 1.
Memo 44
ENGLISH Memo 45
Memo 46
ENGLISH Memo 47
P/N :