
User`s manual


9 English
NOTE
• Be sure to install the air filter after servicing.
(Missing air filter causes clogged heat exchange ele-
ment.)
The air filter is an optional item and the replacement is
available.
5. Install the maintenance cover.
Refer to page 8 (4-1, 1).
∗ Consult your dealer if you want to change the time setting
for when the filter sign goes on.
NOTE
• Do not remove the air filter except when cleaning.
Breakdown may occur.
4-2 HOW TO CLEAN THE HEAT EXCHANGE ELE-
MENT
AT LEAST ONCE EVERY TWO YEARS
(FOR GENERAL OFFICE USE)
(CLEAN THE ELEMENT MORE FREQUENTLY IF NECES-
SARY.)
WARNING
• Please exchange the heat exchange element if you find
that the knob of the heat exchange element is damaged
or is deteriorated when cleaning it.
There is falling danger.
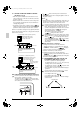
1. Detach the maintenance cover.
Refer to page 8 (4-1, 1).
2. Detach the air filter.
Refer to page 8 (4-1, 2).
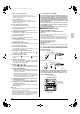
3. Take out the heat exchange elements.
Pull out the air filter and then pull out the two heat
exchanger elements. (Refer to figure 11)
4. Use a vacuum cleaner to remove dust and foreign objects
on the surface of the heat exchange element.
(Refer to figure 12)
• Use the vacuum cleaner equipped with a brush on the
tip of the suction nozzle.
• Lightly contact the brush on the surface of the heat
exchange element when cleaning.
(Do not crush the heat exchange element while clean-
ing.)
CAUTION
• Do not clean touching strongly with a vacuum cleaner. This
may crush the mesh of the heat exchange elements.
• Never wash the heat exchange element with water.
• Have your dealer professionally clean the filter if it is very
dirty.
5. Put the heat exchange element on the rail and insert it
securely in place.
6.
Install the air filter securely in place. (Refer to page 8 (4-1, 4))
7. Install the maintenance cover securely in place.
(Refer to page 9 (4-1, 5))
4-3 INSPECTION AND MAINTENANCE OF THE
HUMIDIFIER
Have your dealer do the following inspections in order to
get the longest use. Once a year is recommended.
For dealers
4-4 REPLACING THE HUMIDIFIER ELEMENT
• The humidifier element needs to be replaced regularly.
The humidifier element should in general be replaced once
every three years when supply water is soft water, but out-
side factors (water quality, hard water, etc.) as well as oper-
ating conditions (24-hour-a-day air conditioning, etc.) may
shorten its productive life.
• Contact your dealer if you have any questions.
5. TROUBLE SHOOTING
5-1 If one of the following malfunctions occurs,
take the measures shown below and contact
your Daikin dealer.
The system must be repaired by a qualified service person.
WARNING
When the HRV is in abnormal conditions (smell of some-
thing burning, etc), cut off the power, and contact your
dealer.
Continued operation under such circumstances may result in a
failure, electric shock, and fire.
• If a safety device such as a fuse, a breaker, or an earth leak-
age breaker frequency actuates, or ON/OFF switch does not
properly work.
Measure: Do not turn the power on.
• The remote control buttons do not work well.
Measure: Turn off the main power switch.
For remote controllers which display the filter sign,
turn on the power after maintenance, and press the
filter sign reset button.
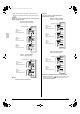
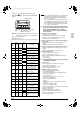
Inspected
part
Content of maintenance Problems if
maintenance
is not carried
out
Items to be
inspected
Solution
Strainer
(80-mesh)
Check for
clogging
Clean if
clogged.
Insufficient
humidifying.
Check o-ring
for cracks
Replace if
cracked.
Leaking.
Feed water
tank
Check for
operation of
float switch
Clean if it
does not
work properly
due to build-
up.
Insufficient
humidifying.
Overflowed
feed water
tank.
Check for dirt
Clean if very
dirty.
Weak fan
strength.
Reduced
humidifying
capacity.
Solenoid
valve
Check for
shutting and
opening.
Check in a
similar fash-
ion when
checking the
float switch
operation.
Replace if it
doesn’t work.
Insufficient
humidifying.
Overflowed
feed water
tank.
3P130767-1_En.fm Page 9 Wednesday, December 17, 2003 7:39 PM