
User`s manual


English 8
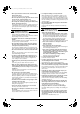
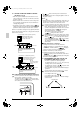
Press the programming time button and set the time for
stopping or starting the system.
Each time this button is pressed, the time
advances or goes backward by 1 hour.
• The timer can be programmed for a maximum of 72 hours.
• Each time when “” is pushed, the time advances one hour.
Each time when “” is pushed, the time goes back one hour.
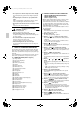
Press the timer on/off button.
The timer setting procedure ends. The display
“” or “” changes from flashing light to
constant light.
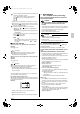
• After the timer is programmed, the display shows the
remaining time.
For cancelling the timer operation, push the timer on/off
button “” once again.
The indication disappears.
NOTE
• When setting the timer off and on at the same time,
repeat the above procedure (from
“”
to
“”
)
once again.
!
!!
!
DETAIL EXPLANATION
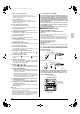
When you want to stop operation after a desired time,
Example:
Set the time to “8”.
↓
“” will display.
Stops operation 8 hours after the reservation is complete.
The program will be cleared after the operation stops.
• Set the stop time during operation.
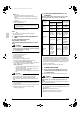
When you want to start operation after a desired time has
elapsed
Example:
Set the time to “8”.
↓
“” will display.
Starts operation 8 hours after the reservation is complete.
The reservation is cancelled after operation starts.
• Set the start time while the unit is stopped.
• The remaining time will count at the same time after reser-
vation is complete.
See the example below if you want to reserve “off after time”
and “on after time” at the same time.
For example: (Refer to figure below)
When the timer is programmed to stop the system after 3 hours
and start the system after 4 hours, the system will stop after 3
hours and start 1 hour later.
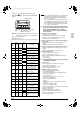
Example:
• Setting “off after 3 hours” and “on after 4 hours” will
↓
• Operation will stop after 3 hours.
Operation will then start in 1 hour from the time it stopped.
4. MAINTENANCE
(for a qualified service person only)
ONLY A QUALIFIED SERVICE PERSON IS ALLOWED TO
PERFORM MAINTENANCE
WARNING
• BEFORE OBTAINING ACCESS TO TERMINAL DEVICES,
ALL POWER SUPPLY CIRCUITS MUST BE INTER-
RUPTED.
• To clean the HRV, or maintenance be sure to stop operation,
and turn the power switch off. It may cause electrical shock
and it is very dangerous to touch the rotating part.
• Do not wash the HRV with water.
Doing so may result in an electric shock.
CAUTION
• Use gloves when cleaning.
Cleaning without gloves may cause injury.
• Watch your step.
Use caution, as this requires working in high places.
4-1 HOW TO CLEAN THE AIR FILTER
Clean the air filter when the display shows “” (TIME TO
CLEAN AIR FILTER).
It will display that it will operate for a set amount of time.
AT LEAST ONCE EVERY YEARS (FOR GENERAL OFFICE
USE)
(CLEAN THE MORE FREQUENTLY IF NECESSARY.)
• Increase the frequency of cleaning if the unit is installed in a
room where the air is etermely contaminated.
• If the dirt becomes impossible to clean, change the air filter
(Air filter for exchange is optional).
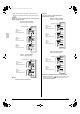
1. Detach the maintenance cover.
Go into ceiling through the inspection hatch, remove binding
metal of maintenance cover and take it off.
(Refer to figure 8-1)
2. Detach the air filter.
Take out from the heat exchange elements.
(Refer to figure 8-2)
3. Clean the air filter. (Refer to figure 9)
Use vacuum cleaner A) or wash the air filter with water B).
A) Using a vacuum cleaner
B) Washing with water
When the air filter is very dirty, use soft brush and neau-
tral detergent.
After cleaning, remove water and dry in the shade.
NOTE
• Do not wash the air filter with hot water of more than 50°C,
as doing so may result in discoloration and/or deformation.
• Do not expose the air filter to fire, as doing so may result in
burning.
• Do not use gasoline, thinner, or other organic solvents.
This may cause discoloration or deformation.
4. Fix the air filter.
If the air filter is washed, remove water completely and allow
to dry for 20 to 30 minutes in the shade. When dried com-
pletely, install the air filter back in place.
(Refer to figure 10)
2
3
1 3
8hr
8hr
hr
hr
3P130767-1_En.fm Page 8 Wednesday, December 17, 2003 7:39 PM