00_CV_3P215731-1D.
00_CV_3P215731-1D.
00_CV_3P215731-1D.
01_EN_3P215731-1D.fm Page 1 Tuesday, February 5, 2008 6:35 PM RXYQ72PYDN RXYQ96PYDN RXYQ120PYDN RXYQ144PYDN RXYQ168PYDN RXYQ192PYDN RXYQ216PYDN RXYQ240PYDN REYQ72PYDN REYQ96PYDN REYQ120PYDN REYQ144PYDN REYQ168PYDN REYQ192PYDN REYQ216PYDN REYQ240PYDN RXYQ72PTJU RXYQ96PTJU RXYQ120PTJU RXYQ144PTJU RXYQ168PTJU RXYQ192PTJU CONTENTS 1. SAFETY CONSIDERATIONS ......................... 1 2. SPECIFICATIONS .......................................... 4 3. WHAT TO DO BEFORE OPERATION............ 5 4.
01_EN_3P215731-1D.fm Page 2 Tuesday, February 5, 2008 6:35 PM • Ask your dealer to install in a machine room that has no water drops by raining. This unit is for indoor use. Incomplete installation performed by yourself may result in a water leakage, electric shock, and fire. • Ask your dealer for improvement, repair, and maintenance. Incomplete improvement, repair, and maintenance may result in a water leakage, electric shock, and fire.
01_EN_3P215731-1D.fm Page 3 Tuesday, February 5, 2008 6:35 PM • Do not turn off the power immediately after stopping operation. Always wait at least five minutes before turning off the power. Otherwise, water leakage and trouble may occur. • The appliance is not intended for use by young children or infirm persons without supervision. • The remote controller should be installed in such away that children cannot play with it.
01_EN_3P215731-1D.fm Page 4 Tuesday, February 5, 2008 6:35 PM [Drainage through Drainpipe] • Make sure that the drainpipe is installed properly to drain water. If no water is discharged from the drainpipe while the air conditioner is cooling operation, the drainpipe may be clogged with dust or dirt and water leakage from the indoor units may result. Stop operating the air conditioner and consult your dealer. 2.
01_EN_3P215731-1D.
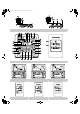
01_EN_3P215731-1D.fm Page 6 Tuesday, February 5, 2008 6:35 PM ” (changeover under control) 3. Display “ It is impossible to changeover heat/cool with the remote controller which display this icon. Refer to the chapter “6-5 SETTING THE MASTER REMOTE CONTROLLER”. ” (air flow flap) 4. Display “ Refer to the chapter “6-3 ADJUSTING THE AIR FLOW DIRECTION”. 5. Display “ ” (ventilation/air cleaning) This display shows that the ventilation unit are in operation. (these are optional accessories.) 18.
01_EN_3P215731-1D.fm Page 7 Tuesday, February 5, 2008 6:35 PM 5. OPERATION RANGE NOTE • Automatic operation (REYQ only) In this operation mode, cool/heat changeover is automatically conducted. • The operation mode cannot be changed with the remote controller whose display shows “ ” (changeover under control). Change the operation mode with the remote controller whose display does not show “ ”.
01_EN_3P215731-1D.fm Page 8 Tuesday, February 5, 2008 6:35 PM NOTE • For machine protection the system may control the air flow rate automatically. • The air flow rate may be adjusted automatically depending on the room temperature or the fan may stop immediately. This is not a malfunction. • It may take sometime for finishing to change the air flow rate. This is normal operation. 5 Press air flow direction adjust button. Refer to the chapter “6-3 ADJUSTING THE AIR FLOW DIRECTION” for details.
01_EN_3P215731-1D.fm Page 9 Tuesday, February 5, 2008 6:35 PM 1 2 3 4 Press the operation mode selector button several times and select “ ” (program dry operation). Press the on/off button. The operation lamp lights up and the system starts operation. 6-3 ADJUSTING THE AIR FLOW DIRECTION (Refer to figure 6) (only for Double-flow, Multi-flow, Corner, Ceilingsuspended and Wall-mounted) 1 Press the air flow direction adjust button (only for FXF, FXH, FXA).
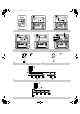
01_EN_3P215731-1D.fm Page 10 Tuesday, February 5, 2008 6:35 PM 6-4 PROGRAMMING START AND STOP OF THE SYSTEM WITH TIMER (Refer to figure 9) • The timer is operated in the following two ways. Programming the stop time “ ” The system stops operating after the set time has elapsed. Programming the start time “ ” The system starts operating after the set time has elapsed. • The timer can be programmed for a maximum of 72 hours. • The start and the stop time can be simultaneously programmed.
01_EN_3P215731-1D.fm Page 11 Tuesday, February 5, 2008 6:35 PM How to designate the master remote controller (Refer to figure 10) 1 2 Press the operation mode selector button of the current master remote controller for 4 seconds. The display showing “ ” (changeover under control) of all remote controllers connected to the same outside unit flashes. Press the operation mode selector button of the controller that you wish to designate as the master remote controller. Then designation is completed.
01_EN_3P215731-1D.fm Page 12 Tuesday, February 5, 2008 6:35 PM 8. SEASONAL MAINTENANCE • • • • • CAUTION Do not touch the air inlets or aluminum fins of the outside or indoor units. Touching them may result in injury. Do not wash the outside or indoor units with water. An electric shock or fire may result. Watch your steps at the time of air filter cleaning etc. If the scaffold is unstable, you may fall or topple down, thus causing injury.
01_EN_3P215731-1D.fm Page 13 Tuesday, February 5, 2008 6:35 PM 9-4 FAN OPERATION IS POSSIBLE, BUT COOLING AND HEATING DO NOT WORK 9-8 NOISE OF AIR CONDITIONERS • Immediately after the power is turned on. The micro computer is getting ready to operate. Wait 10 minutes. • A “zeen” sound is heard immediately after the power supply is turned on. The electronic expansion valve inside an indoor unit starts working and makes the noise. Its volume will reduce in about 1 minute.
01_EN_3P215731-1D.fm Page 14 Tuesday, February 5, 2008 6:35 PM 9-12 THE DISPLAY SHOWS “ ” • This is the case immediately after the main power supply switch is turned on and means that the remote controller is in normal condition. This continues for 1 minute. 9-13 THE COMPRESSOR OR FAN IN THE OUTSIDE UNIT DOES NOT STOP • This is to prevent oil and refrigerant from remaining in the compressor. The unit will stop after 5 to 10 minutes.
01_EN_3P215731-1D.fm Page 15 Tuesday, February 5, 2008 6:35 PM • Check if the remote controller display shows “ ” (time to clean the air filter); Refer to the operation manual of the indoor unit. And clean the air filter. • Check the temperature setting. Refer to “Operation procedure”. • Check the fan speed setting on your remote controller. Refer to “Operation procedure”. • Check for open doors or windows. Shut doors and windows to prevent wind from coming in.
01_EN_3P215731-1D.fm Page 16 Tuesday, February 5, 2008 6:35 PM Note 2 This maintenance cycle indicates recommended lengths of time until the need arises for maintenance work, in order to ensure the product is operational as long as possible. Use for appropriate maintenance design (budgeting maintenance and inspection fees, etc.). Depending on the content of the maintenance and inspection contract, the inspection and maintenance cycles may in reality be shorter than those listed here.
00_CV_3P215731-1D.fm Page 4 Wednesday, February 6, 2008 11:34 AM 1645 Wallace Drive, Suite 110 Carrollton, TX 75006 info@daikinac.com www.daikinac.