
Installation manual

Installation manual
21
REMQ8P9 + REMQ10~16P8 + REMHQ12P8Y1B
VRVIII System air conditioner
4PW48463-1A
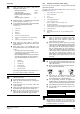
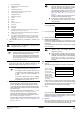
* = The state of this LED is not important.
9. Complete
If the calculated amount of refrigerant is reached, close valve A
and press the button once.
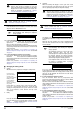
10. In case leak detection function is required
Press the button once for post-processing with
regard to the leak detection function and press the
button to confirm that charging is completed.
Record the amount that was added on the additional refrigerant
charge label provided with the unit and attach it on the back side
of the front panel.
Perform the procedure "11.6. Procedure for inputting the
additional refrigerant charge weight into the PCB" as described
on page 22.
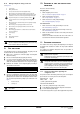
10. In case leak detection function is not required
Press the button once and the charging is complete.
Record the amount that was added on the additional refrigerant
charge label provided with the unit and attach it on the back side
of the front panel.
Perform the procedure "11.6. Procedure for inputting the
additional refrigerant charge weight into the PCB" as described
on page 22.
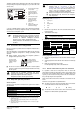
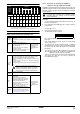
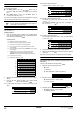
■ Charging in cooling mode
6. Start up
Wait while the unit is preparing for charging in cooling mode.
It takes about 2 to 10 minutes for the system to become stable.
In case of a small charging amount, the system will start
charging the refrigerant before the system reaches the stable
state. It may disturb a correct decision and may cause
overcharging.
7. Ready
Press the button once within 5 minutes.
If the button is not pushed within 5 minutes, P2 will be
displayed on the remote controller. Refer to "3 Remote controller
malfunction code display" on page 22.
8. Operation
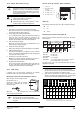
When the following LED display is shown, open valve A and
close the front panel. If the front panel is left open, the system
can not operate properly during the refrigerant charging.
*
= The state of this LED is not important.
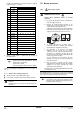
9. Complete
The display on the remote controller shows a flashing PE code
for signalling that automatic charging will be finished in about 10
minutes.
When the unit stops operating, close valve A immediately and
check the LEDs and check if the P9 code is displayed on the
remote controller.
If it is not as shown above, correct the malfunction (as indicated
in the display of the remote controller) and restart the complete
charging procedure. When the charging amount is little, the PE
code may not be displayed, but instead the P9 code will be
displayed immediately.
10. In case leak detection function required
Press the button once for post-processing with
regard to the leak detection function and press the
button to confirm that charging is completed.
Record the amount that was added on the additional refrigerant
charge label provided with the unit and attach it on the back side
of the front panel.
Perform the procedure "11.6. Procedure for inputting the
additional refrigerant charge weight into the PCB" as described
on page 22.
10. In case leak detection function not required
Press the button once and the charging is complete.
Record the amount that was added on the additional refrigerant
charge label provided with the unit and attach it on the back side
of the front panel.
Perform the procedure "11.6. Procedure for inputting the
additional refrigerant charge weight into the PCB" as described
on page 22.
When the refrigerant tank is not connected or is left
with the valve closed for 30 minutes or more, the
outdoor unit will stop operation and the P2 code will be
displayed on the remote controller of the indoor unit.
Follow the procedure as described in "3 Remote
controller malfunction code display" on page 22.
H1P H2P H3P H4P H5P H6P H7P
wc
*****
When a malfunction occurs, check the display of the
remote controller and refer to "3 Remote controller
malfunction code display" on page 22.
NOTE
Always close valve A and remove the refrigerant
tank immediately after finishing the refrigerant
charge operation.
H1P H2P H3P H4P H5P H6P H7P
cccwwww
H1P H2P H3P H4P H5P H6P H7P
Pressure control
(for the first minute)
xcxxxxw
Start up control
(for the next 2 minutes)
xcx x xwx
Waiting for stable
cooling conditions
(for the next ±15
minutes (according to
the system))
xcxxxww
H1P H2P H3P H4P H5P H6P H7P
cccxwxw
BS3 RETURN
BS4 TEST
BS1 MODE
BS1 MODE
BS4 TEST
BS4 TEST
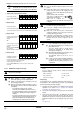
When the refrigerant tank is not connected or is left
with the valve closed for 30 minutes or more, the
outdoor unit will stop operation and the P2 code will be
displayed on the remote controller of the indoor unit.
Follow the procedure as described in "3 Remote
controller malfunction code display" on page 22.
H1P H2P H3P H4P H5P H6P H7P
wc
*****
When a malfunction occurs, check the display of the
remote controller and refer to "3 Remote controller
malfunction code display" on page 22.
H1P H2P H3P H4P H5P H6P H7P
cccwwww
NOTE
Always close valve A and remove the refrigerant
tank immediately after finishing the refrigerant
charge operation.
The refrigerant charge port of these units have
electric expansion valves that will close
automatically when refrigerant charging operation
has finished. However, the electric expansion
valves will be opened when other operations start
after finishing refrigerant charging operation.
If the refrigerant tank is left with the valve open,
the amount of refrigerant which is properly
charged may be off the point.
H1P H2P H3P H4P H5P H6P H7P
wccwwww
BS4 TEST
BS1 MODE
BS1 MODE