
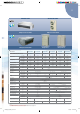
Specifications


17
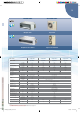
OPTIONAL ACCESSORIES
BRC230Z4 for up to four zones (230 – 240 volt damper motors)
BRC230Z8 for up to eight zones (230 – 240 volt damper motors)
BRC24Z4 for up to 4 zones (24 volt damper motors)
BRC24Z8 for up to 8 zones (24 volt damper motors)
BRCSZC – second slave controller ideal for double storey or larger homes
BRC1E61 – full function LCD wired remote controller
Programmable 7-day timeclock with temperature set-back control
BRC2A51 – simple LCD wired remote controller
BRC4C62 – infra-red wireless remote controller kit
AKRCSO1-1 – room mounted remote temperature sensor
KRP1B5X – adaptor PCB for field supplied electric booster heater and
outside air fan interlock
KRP4A51 – adaptor PCB for external control (e.g. timelock, BMS)
DCS302CA61 – centralised controller for up to 64 groups
DST301BA61 – programmable Schedule Timer
DTA102A52 – interface PCB for central control
KKPJ5F180 – drain plug connection for outdoor units (RZQ71F, RZQ4P,
R(Z)Q100/125/160K)
KKP937A4 – drain plug connection for outdoor units, (RXS50F, RXS60F)
KHBK – indoor unit hanging kit (for suspending from rafters or slabs) for
FDYQ(N)71-160
KRP58M51 – demand adaptor
DASMS05 – Daikin i-text
KWC26C280 – drain plug kit to suit RZYQ8
KWC26C450 – drain plug kit to suit RZQ10
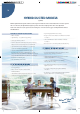
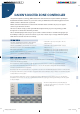
1. ON/OFF – Press this button to turn the air conditioner ON and OFF.
2. MODE selector – Press this button to select the AUTO/COOL/HEAT/
DRY/FAN mode.
3. FAN setting – Press this button to select the air flow rate.
4. TEMPERATURE adjustment button – Press this button to make
temperature adjustments and other settings.
5. 7 DAY TIME CLOCK – Press this button to go to the setting display
for the “S. 7 Day Timer” and “M. 7 Day Timer”.
6. ON/OFF TIMER – Press this button to set the ON TIMER
and OFF TIMER.
7. SHIFT – Press this button to change the display at the time
of making settings.
8. ENTER – Press this button to accept the settings that have
been made.
9. CLEAR – Press this button to cancel settings.
10. TEST/EXIT – Press this button to exit programs.
11. DAY/TIME – Press this button to go to the clock and day setting.
12. SELECT SENSOR – Press this button for sensor selection.
13. FIXING SENSOR – Press this button to enter the sensor selection
that has been made.
14. ZONE – Press this button to make zone settings.
15. DISPLAY – The present settings are displayed on the LCD.
1
5
6
7
8
9
2
3
10
12
11 13
15
14
4
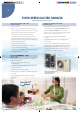
EASY TO OPERATE
CONTROLLED COMFORT
AT YOUR FINGERTIPS
DKA0680_DuctedBro_V2.indd 17 6/10/09 12:45:17 PM