
Specifications


IM 938-4 / Page 14 of 42
Installing Room Cabinet
The room cabinet is the last piece to install. The following
instructions assume all components (wall sleeve, heat
section, louver and chassis) have been installed, piped
and anchored. All major room construction should also be
complete so as not to damage the room cabinet after it has
been installed. Attaching the room cabinet can be completed
as follows:
1. Firmly grasp the room cabinet and lift it over the heat
section. There are notches in the back anges of the
room cabinet that rest on the wall sleeve to assure it is
centered.
2. Align the notches of the room cabinet on the wall sleeve
and rmly push the cabinet downward until it seats on
the wall sleeve (see Figure 16).
3. Screw the cabinet to the wall using the screws provided.
There are two (2) screw holes provided on each side
located on the inner anges of the room cabinet.
4. Loosen the four (4) wing nuts on the kickplate and adjust
the kickplate the required distance to the oor.
5. Tighten the wing nuts rmly.
6. Wipe any smudges or dirt off the room cabinet using a
mild cleaner and a soft cloth.
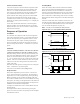
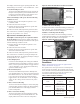
Figure 16: Room Cabinet Detail
Screw slots on back of cabinet
for securing to wall (2-each side)
Notch on back of cabinet to
set on wall sleeve
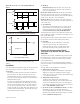
Supply and Return Coil Arrangements
Steam
Figure 17: Left-hand supply and return
Supply
Return
Figure 18: Right-hand supply and return
Supply
Return
Figure 19: Right-hand supply, left-hand return
Supply
Return
Figure 20: Left-hand supply, right-hand return
Supply
Return
Hot Water
Figure 21: Left-hand supply and return
Supply
Return
Figure 22: Right-hand supply and return
Return
Supply
Figure 23: Left-hand supply, right-hand return or Right-
hand supply, left-hand return
Return
or
Supply
Return or
Supply