
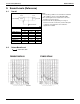
Specifications


Installation EDUS39-900A-F4
28 FXMQ-P
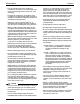
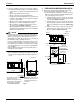
(4) Remove the washer fixing plates for the falling prevention
of the washers for the hanging brackets, tighten the nuts
on the upper side, and securely fix the unit.
• Use the level and check that the unit is installed
horizontally. (4-directions)
• In the case of using a vinyl tube in place of the level, put the
both edges of the vinyl tube in close contact with the bottom
of the product to make levelness adjustment.
If the unit is installed at a slant with the drain pipe side set
high, in particular, the float switch will not operate normally
and water leakage may result.
5. REFRIGERANT PIPING WORK
<As for the refrigerant piping of the outdoor unit, refer to
the installation manual provided to the outdoor unit.>
<Perform heat insulation work on both gas piping and
liquid piping, or otherwise water leakage may result.>
Be sure to use insulation that is designed for use with
HVAC Systems.
<Reinforce the insulation material for the refrigerant pip-
ing if the ambient temperature is high, or otherwise dew
condensation may result on the surface of the insulation
material.>
<Make sure that the refrigerant is R410A before refriger-
ant piping work. If the refrigerant is different, the air con-
ditioner will not operate normally.>
CAUTION
This product uses new refrigerant (R410A) only. Be sure
to keep the items on the right-hand side and conduct the
installation work.
• Use a dedicated pipe cutter and flare tool for R410A.
• When connecting the flare, apply ether oil or ester oil
only to inner side of the flare.
• Be sure to use the flare nut provided with the unit.
(Do not use a different flare nut (such as a type-1
flare nut), or otherwise refrigerant leakage may
result.)
• Perform the curing of the piping with pinching or tap-
ing of the piping in order to prevent the intrusion of
dirt, dust, and moisture into the piping.
CAUTION
• Be sure to use the specified type of refrigerant for
the refrigeration cycle and do not contaminate the
refrigerant with air.
• Ventilate the room in case of refrigerant leakage dur-
ing installation work.
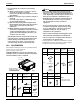
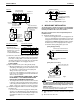
(1) Connect the piping.
• The outdoor unit is filled with refrigerant.
• When connecting or disconnecting piping to or from the
unit, be sure to use two spanners and two torque
wrenches. (Refer to Fig. 4)
• Refer to Table 1 for the processing dimensions of the
flare.
• Use the flare nut provided with the unit.
• Apply ether oil or ester oil only to inner side of the
flare and screw in the flare nut three to four turns first by
hand at the time of connecting the flare nut.
(Refer to Fig. 5)
• Refer to Table 1 for the corresponding tightening
torque.
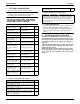
Ta bl e 1
• Do not excessively tighten the flare nut.
Doing so will break the flare nut and refrigerant leakage
may result.
• Make sure that all parts around the flare are free of oil.
The drain pan and the resin part may be deteriorated if oil
is attached.
• If no torque wrenches are available, refer to Table 2 as
a standard.
When the flare nut is tightened with the spanner, the
tightening torque should increase suddenly. Tighten the
flare nut further for the corresponding angle shown in
Tab l e 2 .
Hanging bracket
Bottom of product
Level
Vinyl tube
Pipe
size
Tightening torque
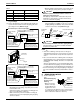
Flare
dimensions
A (in.)
Flare shape
1/4 10.4 – 12.7 lbf·ft
0.342 –
0.358
3/8 24.1 – 29.4 lbf·ft
0.504 –
0.520
1/2 36.5 – 44.5 lbf·ft
0.638 –
0.654
5/8 45.6 – 55.6 lbf·ft
0.760 –
0.776
Torque wrench
Spanner
Piping union
Flare nut
Fig. 4
Fig. 5
Apply ester oil or ether oil
only to inner side of flare.
A
45
0
±
2
0
R0.016-0.031
90
0
±
2
0