00_CV_3P191290-1K.
01_EN_3P191290-1K.fm Page 1 Saturday, March 28, 2009 11:41 AM CONTENTS READ BEFORE OPERATION Safety precautions ......................................... 2 Names of parts............................................... 4 Preparation Before Operation ........................ 7 OPERATION AUTO · DRY · COOL · HEAT · FAN Operation ..................................................... 10 Adjusting the Airflow Direction ..................... 12 POWERFUL Operation ................................
01_EN_3P191290-1K.fm Page 2 Saturday, March 28, 2009 11:41 AM READ BEFORE OPERATION Safety precautions • • • • Keep this manual where the operator can easily find them. Read this manual attentively before starting up the unit. For safety reason the operator must read the following cautions carefully. This manual classifies precautions into WARNINGS and CAUTIONS. Be sure to follow all precautions below: they are all important for ensuring safety.
01_EN_3P191290-1K.fm Page 3 Saturday, March 28, 2009 11:41 AM • Do not block air inlets nor outlets. Impaired air flow may result in insufficient performance or trouble. • Do not stand or sit on the outdoor unit. Do not place any object on the unit to avoid injury, do not remove the fan guard. • Do not place anything under the indoor or outdoor unit that must be kept away from moisture. In certain conditions, moisture in the air may condense and drip.
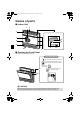
01_EN_3P191290-1K.fm Page 4 Saturday, March 28, 2009 11:41 AM Names of parts ■ Indoor Unit 1 2 8 3 7 12 10 4 2 9 5 11 6 ■ Opening the Front Panel How to open the front panel: (page 26.) Air outlet selection switch • This setting blows air from upper outlet only. • This setting automatically decides a blow pattern depending on mode and conditions. • This setting is recommended. 13 • The unit is shipped from the factory with this setting.
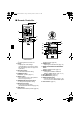
01_EN_3P191290-1K.fm Page 5 Saturday, March 28, 2009 11:41 AM ■ Outdoor Unit 25/35 class 50 class 15 15 16 16 17 17 18 19 19 18 ■ Indoor Unit 1. Titanium Apatite Photocatalytic Air-Purifying Filter: • These filters are attached to the inside of the air filters. 2. Air outlet 3. Display 4. Front panel 5. Vertical blades (louvers): (page 12.) • The louvers are inside of the air outlet. 6. Air inlet 7. Air filter 8. Horizontal blade (flap): (page 12.) 9. Operation lamp (green) 10.
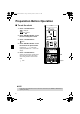
01_EN_3P191290-1K.fm Page 6 Saturday, March 28, 2009 11:41 AM ■ Remote Controller 1 2 5 3 6 4 7 8 11 12 13 15 9 10 14 16 1. Signal transmitter: • It sends signals to the indoor unit. 2. Display: • It displays the current settings. (In this illustration, each section is shown with all its displays ON for the purpose of explanation.) 3. FAN setting button: • It selects the airflow rate setting. 4. POWERFUL button: POWERFUL operation (page 14.) 5.
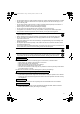
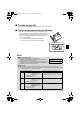
01_EN_3P191290-1K.fm Page 7 Saturday, March 28, 2009 11:41 AM Preparation Before Operation ■ To set the batteries 2 1. Slide the front cover to take it off. Position + and – correctly! 2. Set two dry batteries AAA.LR03 (alkaline). 3. Set the front cover as before. 3 1 ■ To operate the remote controller • To use the remote controller, aim the transmitter at the indoor unit. If there is anything to block signals between the unit and the remote controller, such as a curtain, the unit will not operate.
01_EN_3P191290-1K.fm Page 8 Saturday, March 28, 2009 11:41 AM Preparation Before Operation ■ To set the clock 1. Press “CLOCK button”. is displayed. and blinks. 2. Press “SELECT button” to set the current day of the week. 3. Press “CLOCK button”. blinks. 4. Press “SELECT button” to set the clock to the present time. Holding down “ ” or “ ” button rapidly increases or decreases the time display. 5. Press “CLOCK button”.
01_EN_3P191290-1K.fm Page 9 Saturday, March 28, 2009 11:41 AM ■ Turn the breaker ON • Turning ON the breaker closes the flap. (This is a normal procedure.) ■ Checks on Remote Controller Settings • This remote controller is common to the heat pump model and cooling only model. Use the dipswitches on the remote controller to set the heat pump model or cooling only model. • Refer to the following explanation and make the setting as shown in the illustration.
01_EN_3P191290-1K.fm Page 10 Saturday, March 28, 2009 11:41 AM OPERATION AUTO · DRY · COOL · HEAT · FAN Operation The air conditioner operates with the operation mode of your choice. From the next time on, the air conditioner will operate with the same operation mode. ■ To start operation 1. Press “MODE selector button” and select a operation mode. • Each pressing of the button advances the mode setting in sequence. : AUTO : DRY 5 4 : COOL : HEAT : FAN 2, 3 1 Cooling only model Heat pump model 2.
01_EN_3P191290-1K.fm Page 11 Saturday, March 28, 2009 11:41 AM ■ To change the airflow rate setting 5. Press “FAN setting button”. DRY mode AUTO or COOL or HEAT or FAN mode Five levels of airflow rate setting from “ The airflow rate setting is not variable. plus “ ”“ ” to “ ” ” are available. • Indoor unit quiet operation When the airflow is set to “ ”, the noise from the indoor unit will become quieter. Use this when making the noise quieter.
01_EN_3P191290-1K.fm Page 12 Saturday, March 28, 2009 11:41 AM Adjusting the Airflow Direction You can adjust the airflow direction to increase your comfort. ■ To adjust the horizontal blade (flap) 1. Press “SWING button ”. • “ ” is displayed on the LCD and the flaps will begin to swing. 2. When the flap has reached the desired position, press “SWING button ” once more. • The flap will stop moving. • “ 1, 2 ” disappears from the LCD.
01_EN_3P191290-1K.fm Page 13 Saturday, March 28, 2009 11:41 AM ■ Airflow selection • Make airflow selection according to what suits you. When setting the airflow selection switch to . • Air conditioner automatically decides the appropriate blowing pattern depending on the operating mode/situation. Operating mode Situation Blowing pattern COOL mode • When the room has become fully cool, or when one hour has passed since turning on the air conditioner.
01_EN_3P191290-1K.fm Page 14 Saturday, March 28, 2009 11:41 AM POWERFUL Operation POWERFUL operation quickly maximizes the cooling (heating) effect in any operation mode. You can get the maximum capacity. ■ To start POWERFUL operation 1. Press “POWERFUL button”. • POWERFUL operation ends in 20minutes. Then the system automatically operates again with the previous settings which were used before POWERFUL operation. • “ ” is displayed on the LCD.
01_EN_3P191290-1K.fm Page 15 Saturday, March 28, 2009 11:41 AM OUTDOOR UNIT QUIET Operation OUTDOOR UNIT QUIET operation lowers the noise level of the outdoor unit by changing the frequency and fan speed on the outdoor unit. This function is convenient during night. ■ To start OUTDOOR UNIT QUIET operation 1. Press “QUIET button”. • “ ” is displayed on the LCD. ■ To cancel OUTDOOR UNIT QUIET operation 2. Press “QUIET button” again. • “ ” disappears from the LCD.
01_EN_3P191290-1K.fm Page 16 Saturday, March 28, 2009 11:41 AM ECONO Operation ECONO operation is a function which enables efficient operation by limiting the maximum power consumption value. This function is useful for cases in which attention should be paid to ensure a circuit breaker will not trip when the product runs alongside other appliances. ■ To start ECONO operation 1. Press “ECONO button”. •“ ” is displayed on the LCD. ■ To cancel ECONO operation 2. Press “ECONO button” again.
01_EN_3P191290-1K.fm Page 17 Saturday, March 28, 2009 11:41 AM TIMER Operation Timer functions are useful for automatically switching the air conditioner on or off at night or in the morning. You can also use OFF TIMER and ON TIMER in combination. ■ To use OFF TIMER operation • Check that the clock is correct. If not, set the clock to the present time. (page 8.) 1. Press “OFF TIMER button”. is displayed. blinks. 2. Press “SELECT button” until the time setting reaches the point you like.
01_EN_3P191290-1K.fm Page 18 Saturday, March 28, 2009 11:41 AM TIMER Operation ■ To use ON TIMER operation • Check that the clock is correct. If not, set the clock to the present time. (page 8.) 1. Press “ON TIMER button”. is displayed. blinks. 2. Press “SELECT button” until the time setting reaches the point you like. • Every pressing of either button increases or decreases the time setting by 10 minutes. Holding down either button changes the setting rapidly. 3. Press “ON TIMER button” again.
01_EN_3P191290-1K.fm Page 19 Saturday, March 28, 2009 11:41 AM WEEKLY TIMER Operation Up to 4 timer settings can be saved for each day of the week. It is convenient if the WEEKLY TIMER is set according to the family’s life style. ■ Using in these cases of WEEKLY TIMER An example of WEEKLY TIMER settings is shown below. Example: The same timer settings are made for the week from Monday through Friday while different timer settings are made for the weekend. [Monday] Make timer settings up to programs 1-4.
01_EN_3P191290-1K.fm Page 20 Saturday, March 28, 2009 11:41 AM WEEKLY TIMER Operation ■ To use WEEKLY TIMER operation Setting mode • Make sure the day of the week and time are set. If not, set the day of the week and time. (page 8.) Program 1 Program 2 Program 3 ON [Monday] OFF Program 4 ON OFF 25˚C 27˚C 6:00 8:30 1. Press “ 17:30 22:00 button”. • The day of the week and the reservation number of the current day will be displayed. • 1 to 4 settings can be made per day. 2.
01_EN_3P191290-1K.fm Page 21 Saturday, March 28, 2009 11:41 AM 8. Press “SELECT button” to select the desired temperature. • The temperature can be set between 10°C and 32°C. Cooling: The unit operates at 18°C even if it is set at 10 to 17°C. Heating: The unit operates at 30°C even if it is set at 31 to 32°C. • To return to the time setting, press “BACK button”. • The set temperature is only displayed when the mode setting is on. 9. Press “NEXT button”.
01_EN_3P191290-1K.fm Page 22 Saturday, March 28, 2009 11:41 AM WEEKLY TIMER Operation Copy mode • A reservation made once can be copied another day of the week. The whole reservation of the selected day of the week will be copied. Program 1 Program 2 Program 3 ON [Monday] OFF 25˚C 6:00 Program 4 ON OFF 27˚C 8:30 17:30 22:00 COPY Program 1 Program 2 Program 3 Program 4 OFF ON OFF [Tuseday] ON to 25˚C 27˚C [Friday] 6:00 8:30 17:30 22:00 1. Press “ button”. 2.
01_EN_3P191290-1K.fm Page 23 Saturday, March 28, 2009 11:41 AM ■ Confirming a reservation • The reservation can be confirmed. 1. Press “ button”. • The day of the week and the reservation number of the current day will be displayed. 2. Press “SELECT button” to select the day of the week and the reservation number to be confirmed. • Pressing the “SELECT button” displays the reservation details. • To change the confirmed reserved settings, select the reservation number and press “NEXT button”.
01_EN_3P191290-1K.fm Page 24 Saturday, March 28, 2009 11:41 AM Note for Multi System 〈〈 What is a “Multi System”? 〉〉 This system has one outdoor unit connected to multiple indoor units. A room Outdoor unit ■ Selecting the operation mode 1. With the Priority Room Setting present but inactive or not present. B room Living room C room When more than one indoor unit is operating, priority is given to the first unit that was turned on.
01_EN_3P191290-1K.fm Page 25 Saturday, March 28, 2009 11:41 AM ■ Priority Room Setting The Priority Room Setting requires initial programming during installation. Please consult your retailer or dealer for assistance. The room designated as the Priority Room takes priority in the following situations; 1. Operation mode Priority. As the operation mode of the Priority Room takes precedence, the user can select a different operation mode from other rooms.
01_EN_3P191290-1K.fm Page 26 Saturday, March 28, 2009 11:41 AM CARE Care and Cleaning CAUTION Before cleaning, be sure to stop the operation and turn the breaker OFF. Units ■ Indoor unit, Outdoor unit and Remote controller 1. Wipe them with dry soft cloth. ■ Front panel 1. Open the front panel. • Slide the two stoppers on the left and right sides inward until they click. 2. Remove the front panel. • Remove the string. • Allowing the front panel to fall forward will enable you to remove it. String 3.
01_EN_3P191290-1K.fm Page 27 Saturday, March 28, 2009 11:41 AM Filters 1. Open the front panel. (page 26.) 2. Remove the air filter. • Press the claws on the right and left of the air filter down slightly, then pull upward. 3. Take off the Titanium Apatite Photocatalytic Air-Purifying Filter. • Hold the tabs of the frame, and remove the claws in 4 places. 4. Clean or replace each filter. See figure. 5.
01_EN_3P191290-1K.fm Page 28 Saturday, March 28, 2009 11:41 AM NOTE • Operation with dirty filters: (1) cannot deodorize the air. (2) cannot clean the air. (3) results in poor heating or cooling. (4) may cause odour. • To order Titanium Apatite Photocatalytic Air-Purifying Filter contact to the service shop there you bought the air conditioner. • Dispose of the old filter as flammable waste. Item Titanium Apatite Photocatalytic Air-Purifying Filter (without frame) 1 set Part No.
01_EN_3P191290-1K.fm Page 29 Saturday, March 28, 2009 11:41 AM TROUBLE SHOOTING Trouble Shooting These cases are not troubles. The following cases are not air conditioner troubles but have some reasons. You may just continue using it. Case Explanation Operation does not start soon. • This is to protect the air conditioner. You should wait for about 3 minutes. • When ON/OFF button was pressed soon after operation was stopped. • When the mode was reselected.
01_EN_3P191290-1K.fm Page 30 Saturday, March 28, 2009 11:41 AM Check again. Please check again before calling a repair person. Case The air conditioner does not operate. (OPERATION lamp is off.) Check • • • • Hasn’t a breaker turned OFF or a fuse blown? Isn’t it a power failure? Are batteries set in the remote controller? Is the timer setting correct? Cooling (Heating) effect is poor.
01_EN_3P191290-1K.fm Page 31 Saturday, March 28, 2009 11:41 AM Call the service shop immediately. WARNING ■ When an abnormality (such as a burning smell) occurs, stop operation and turn the breaker OFF. Continued operation in an abnormal condition may result in troubles, electric shocks or fire. Consult the service shop where you bought the air conditioner. ■ Do not attempt to repair or modify the air conditioner by yourself. Incorrect work may result in electric shocks or fire.
01_EN_3P191290-1K.fm Page 32 Saturday, March 28, 2009 11:41 AM Fault diagnosis. FAULT DIAGNOSIS BY REMOTE CONTROLLER In the ARC452A series, the temperature display sections on the main unit indicate corresponding codes. 1. When the TIMER CANCEL button is held down for 5 seconds, a “ ” indication flashes on the temperature display section. TIMER CANCEL button It cancels the timer setting. 2. Press the TIMER CANCEL button repeatedly until a continuous beep is produced.
01_EN_3P191290-1K.
01_EN_3P191290-1K.
00_CV_3P191290-1K.fm Page 2 Saturday, March 21, 2009 1:14 PM Two-dimensional bar code is a code for manufacturing.