
Installation manual


English 4
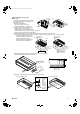
Mount chamber lid
and air filter
(accessory).
For bottom intake, replace the chamber lid and
the protection net (only for 25-35 type) in the
procedure listed in Fig.
(1)Remove the protection net.
(only for 25-35 type, 6 locations)
Remove the chamber lid. (7 locations)
(2)Reattach the removed chamber lid in the
orientation shown in Fig.(7 locations)
Reattach the removed protection net in the
orientation shown in Fig. (only for 25-35 type, 6 locations)
Refer to Fig.for the direction of the protection net.
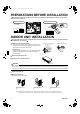
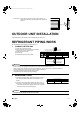
(3)Attach sealing pad as shown in the figure below. (Stored in outlet vent) (only for 50-60 type)
(In order to take in the air inside the ceiling, and when not taking in air from outdoor air, it is not necessary to stick.)
• Attach the sealing pad (accessory) to
the plate metal sections which are not
covered by anti-sweat material.
• Make sure there are no gaps between
the different pieces of sealing pad.
(4)Attach the hanger (right) insulation to the right hanger. (Stored in outlet vent)
(See the below figure for the sticking base line.)
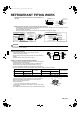
(5)Attach the air filter (accessory) in the manner shown in the diagram.
Air inlet
Air inlet
(1)
Chamber lid
(2)
Air discharge
Air discharge
Chamber lid
Protection net
Protection net
Air inlet
(3)
Air
discharge
Air
discharge
Air inlet
Anti-sweat material
included with the product
Anti-sweat material
included with the product
Sealing pad (Small)
For rear intake type
Sealing pad (Large)
Sealing pad (Small)
(accessory) (accessory)
Sealing pad
(Large)
(accessory) (accessory)
For bottom intake type
Hanger (right) insulation
Slit
Sticking base line
Hanger bracket (right)
ARROW VIEW
In case of bottom side
In case of back side
Filter
Force
Force
Main unit
Attach the
filter to the
main unit
while
pushing
down on
the bends.
(2 bends for
25-35 type,
3 bends for
50-60 type)
01_EN_3P132003-3N.fm Page 4 Tuesday, December 5, 2006 1:29 PM