
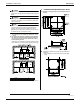
Specifications

Installation of indoor unit EDUS281104
92 Installation of indoor / outdoor unit
3PN06240-3E
7
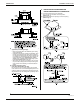
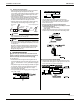
6. INDOOR UNIT INSTALLATION
Installing optional accessories (except for the decoration
panel) before installing the indoor unit is easier. However,
for existing ceilings, install fresh air inlet component kit
and branch duct before installing the unit.
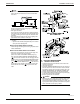
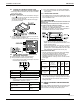
(1) Install the indoor unit temporarily.
• Attach the hanger bracket to the suspension bolt. Be sure
to fix it securely by using a nut and washer from the upper
and lower sides of the hanger bracket.
The washer fixing plate (7) will prevent the washer from
falling.
6-1 For new ceilings
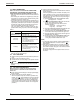
(2) • Refer to the paper pattern for installation (5) for ceiling
opening dimension.
Consult the builder or carpenter for details.
• The center of the ceiling opening is indicated on the
paper pattern for installation.
The center of the unit is indicated on the label attached to
the unit and on the paper pattern for installation.
• After removing the packaging material from the 4 corners
of the paper pattern for installation (5), fix the paper pat-
tern to the unit with screws (6) (×4).
• Ceiling height is shown on the side of the paper pattern
for installation (5). Adjust the height of the unit according
to this indication.
〈
〈〈
〈Ceiling work〉
〉〉
〉
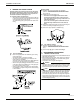
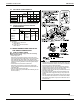
(3) Adjust the unit to the right position for installation.
(Refer to “PREPARATIONS BEFORE INSTALLATION-
(1)”.) (Page 5)
(4) Check the unit is horizontally level.
• The indoor unit is equipped with a built-in drain
pump and float switch. At each of the unit’s 4 cor-
ners, verify that it is level by using a water-level or a
water-filled vinyl tube.
(If the unit is inclined against condensate flow, the
float switch may malfunction and cause water to
drip.)
(5) Remove the washer fixing plate (7) used for preventing the
washer from falling and tighten the upper nut.
(6) Remove the paper pattern for installation (5).
6-2 For existing ceilings
(2) Adjust the height and position of the unit.
(Refer to “PREPARATIONS BEFORE INSTALLATION-
(1)”.)
(3) Perform steps (4), (5) in “6-1 For new ceilings”.
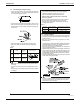
7. REFRIGERANT PIPING WORK
7-1 GENERAL INSTRUCTIONS
•
For refrigerant pipe of outdoor units, see the installation manual
attached to the outdoor unit.
• Before refrigerant piping work, check which type of refriger-
ant is used. Proper operation is not possible if the types of
refrigerant are not the same.
• The outdoor unit is charged with refrigerant.
DANGER
• Refrigerant gas may produce toxic gas if it comes in contact
with fire such as from a fan heater, stove or cooking device.
Exposure to this gas could cause severe injury or death.
NOTE
• Use a pipe cutter and flare suitable for the type of refrigerant.
• To prevent dust, moisture or other foreign matter from infil-
trating the tube, either pinch the end or cover it with tape.
• Do not allow anything other than the designated refrigerant
to get mixed into the refrigerant circuit, such as air, etc. If any
refrigerant gas leaks while working on the unit, ventilate the
room thoroughly right away.