
Specifications

EDUS281104 Installation of indoor unit
Installation of indoor / outdoor unit 91
3PN06240-3E
6
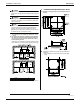
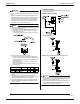
(2) Make the ceiling opening needed for installation where
applicable. (For existing ceilings)
• Refer to the paper pattern for installation (5) for ceiling
opening dimensions.
• Create the ceiling opening required for installation. From
the side of the opening to the casing outlet, implement
the refrigerant and drain pipe and remote controller wire
(unnecessary for wireless type) and indoor-outdoor unit
casing outlet. Refer to the “REFRIGERANT PIPING
WORK (Page 7), DRAIN PIPING WORK (Page 9) and
ELECTRIC WIRING WORK (Page 10)”.
• After making an opening in the ceiling, it may be neces-
sary to reinforce ceiling beams to keep the ceiling level
and to prevent it from vibrating. Consult the builder for
details.
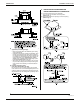
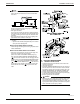
(3) Install the suspension bolts.
(Use either a W3/8 or M10 size bolt)
Use a hole-in anchor for existing ceilings, and a sunken
insert, sunken anchor or other field supplied parts for new
ceilings to reinforce the ceiling to bear the weight of the unit.
Adjust clearance from the ceiling before proceeding further.
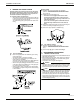
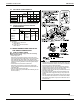
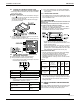
5. INSTALLATION PROCEDURES FOR
FRESH AIR INTAKE DUCT CONNECTION
(1) Cut off the knockout hole on the side plate.
Then, cut the inner insulation of the hole portion.
(Refer to Fig. 1)
(2) Adhere the insulation for opening of unit to the opening.
(Refer to Fig. 2)
〈 〉