Cube Network Camera Quick Start Guide ZHEJIANG DAHUA VISION TECHNOLOGY CO., LTD. V1.0.
Quick Start Guide Foreword General This manual introduces the installation and operation of network camera. Read carefully before using the device, and keep the manual safe for future reference. Safety Instructions The following signal words might appear in the manual. Signal Words Meaning Indicates a medium or low potential hazard which, if not avoided, could result in slight or moderate injury.
Quick Start Guide ● Upgrade the reader software or try other mainstream reader software if the manual (in PDF format) cannot be opened. ● All trademarks, registered trademarks and the company names in the manual are the properties of their respective owners. ● Please visit our website, contact the supplier or customer service if any problems occur while using the device. ● If there is any uncertainty or controversy, we reserve the right of final explanation.
Quick Start Guide Important Safeguards and Warnings This section introduces content covering the proper handling of the device, hazard prevention, and prevention of property damage. Read carefully before using the device, and comply with the guidelines when using it. Transportation Requirements ● Transport the device under allowed humidity and temperature conditions. ● Pack the device with packaging provided by its manufacturer or packaging of the same quality before transporting it.
Quick Start Guide against lightning. For outdoor scenarios, strictly comply with the lightning protection regulations. ● Ground the function earthing portion of the device to improve its reliability (certain models are not equipped with earthing holes). The device is a class I electrical appliance. Make sure that the power supply of the device is connected to a power socket with protective earthing. ● The dome cover is an optical component.
Quick Start Guide ● Use the accessories suggested by the manufacturer. Installation and maintenance must be performed by qualified professionals. ● Do not directly touch the photosensitive CMOS. Use an air blower to clean the dust or dirt on the lens. When it is necessary to clean the device, slightly wet a soft cloth with alcohol, and gently wipe away the dirt. ● Clean the device body with a soft dry cloth.
Quick Start Guide Table of Contents Foreword ........................................................................................................................................................................................................I Important Safeguards and Warnings............................................................................................................................................ III 1 Cable ..............................................................................
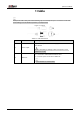
Quick Start Guide 1 Cable Waterproof all the cable joints with insulating tape and waterproof tape to avoid short circuit and water damage. For the detailed operation, see FAQ manual. Figure 1-1 Cables Table 1-1 Cable information No. Port name Description Inputs 12 VDC power. Be sure to supply power as instructed in the manual. 1 Power input Device abnormity or damage could occur if power is not supplied correctly. 2 Ethernet ● Connects to network with network cable.
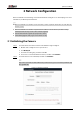
Quick Start Guide 2 Network Configuration Device initialization and IP setting can be finished with the ConfigTool or on the webpage. For more information, see Web Operation Manual. ● Device initialization is available on select models, and it is required at first-time use and after the device is reset. ● Device initialization is available only when the IP addresses of the device (192.168.1.108 by default) and the PC stays on the same network segment. ● Plan usable network segment properly for the device.
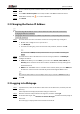
Quick Start Guide Step 3 Set and confirm the password of the devices, enter a valid email address, and then click Next. Step 4 Select Auto-check for updates as needed, and then click OK to initialize the device. Step 5 If initialization failed, click Click Finish. to see more information. 2.2 Changing the Device IP Address ● You can change the IP address of one or more devices at a time. This section is based on changing IP addresses in batches.
Quick Start Guide 3 Installation 3.1 Packing List ● Tools required for the installation, such as electric drill, are not included in the package. ● The operation manual and information on the tools are on the disk or the QR code. Figure 3-1 Packing list 3.
Quick Start Guide 3.3 Installing the Camera 3.3.1 Installation Methods Figure 3-3 Installation methods 3.3.2 (Optional) Installing the SD Card ● SD card slot is available on select models. ● Disconnect the power before installing or removing the SD card. Press the reset button for 10 seconds to reset the device. Figure 3-4 Install SD card 3.3.3 Attaching the Camera Make sure that the mounting surface is strong enough to hold at least three times the weight of the device and bracket.
Quick Start Guide Figure 3-5 Attaching the Camera 3.3.4 (Optional) Installing Waterproof Connector This part is needed only when there is waterproof connector in the package and the device is used outdoors.
Quick Start Guide Figure 3-6 Install waterproof connector 3.3.
Quick Start Guide