Smart Phone Monitor Software User’s Manual Version 3.00.
Table of Contents 1 OVERVIEW.............................................................................................................................. 1 1.1 General Introduction ................................................................................................................ 1 1.2 Features .................................................................................................................................... 1 2 DOWNLOADING AND INSTALLATION .............................
1 Overview 1.1 General Introduction This manual is designed for smart phone to perform monitoring function. It is built on traits of mobile device to include functions of multiple touch control, touch signal recognition, alarm push, DDNS analysis and etc. Users can conveniently add and delete functional modules. This allows users to manage the interface to meet different needs between general and advanced users.
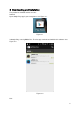
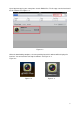
2 Downloading and Installation The product has Android and iOS versions. Android: Open Google Play app in your smart phone. See Figure 2- 1. Figure 2- 1 In Google Play, search gDMSS Plus. The first app searched out should be this software. See Figure 2- 2.
Open App Store app in your smart phone. Search iDMSS Plus. The first app searched out should be this software. See Figure 2- 3. Figure 2- 3 When the downloading completes, the corresponding icon of this software will be displayed in interface. You can touch the icon to open software.
3 Operation 3.
Figure 3- 1 The software interface is shown in Figure 3- 1. For example, those functions listed in Figure 3- 1 are currently used by user of the smart phone. Users can add functions by touching Add button. Users can long touch the screen to modify icon sequence or delete icons. Touch blank area or back button to exit modification. 3.
Figure 3- 2 Figure 3- 3 You can touch Device Manager icon shown in Figure 3-2 to manage devices. Touch Add button shown in Figure 3-3, you can select between Manually Add and from DDNS.
Figure 3- 4 Figure 3- 5 Select Manually Add to enter device info page and you need to input information of the device. See Figure 3-4 and Figure 3-5. Name: Device name displayed in mobile monitor software. Address: Address (IP or domain name) of DVR OR network camera to connect. Port: Port no. of DVR OR network camera to connect. Username: Login username of device. Password: login password corresponding to the username. Channel: fill in a number between 1 to 128 as total number of channels.
Figure 3- 6 Figure 3- 7 Select from DDNS shown in Figure 3-5, the DDNS login box pops up. See Figure 3-6. Input your login username and once you have successfully logged in, the software will automatically download device list under your account. You can touch the add button to add corresponding device into the mobile monitor software. See Figure 3-7. The function allows you to save all the devices on DDNS server, and to monitor these devices from different smart phones. 3.
Figure 3- 8 Figure 3- 9 The live preview interface is the main interface that user will see after login. User can enter this interface also via live preview icon in Figure 3-8. Touch the red box in Figure 3-9 and device list pops up. Devices in the list are added after Chapter 3.2. Touch channel you want to open in device list, and then you can view the selected channels in live preview interface. It supports max four channels. See Figure 3-10 and Figure 311.
Figure 3- 10 Figure 3- 11 Figure 3- 12 10
Figure 3-12 is live preview interface of a certain channel. You can double touch a window to view its channel in full screen. The software also supports vertical/horizontal switch of view. For device with PTZ, you can control its movement in live preview via the keys on screen. 3.3.1 Functions Figure 3- 13 Live preview menu includes main menu (at bottom) and sub-menu. Sub menu changes according to main menu item selected at bottom. See Figure 3-13. The definition of each button is listed below.
Volume control of video Single touch to start a bidirectional talk with selected window. Long press to select a single device from device list. Create snapshot of selected window(view in local file) Locally record selected window (view in local file) Open device list 3.3.2 PTZ Control Figure 3- 14 PTZ menu key can control channels with PTZ function under monitoring. See Figure 3-14.
The definition of each button is listed below.
Iris decrease PTZ function also supports control via signs on screen. See Figure 3- 15. Figure 3- 15 3.3.
Figure 3- 16 Touch favorites icon in favorite sub-menu to group windows. See Figure 3- 16. This favorite group also supports recall of last channel played in a certain window. You can switch group via left-right slide. 3.3.4 Image Adjustment Figure 3- 17 Image adjustment supports adjustment of video under monitoring. From left to right are: brightness, contrastness, saturation and reset button. Each value ranges from 0 to 100. 3.3.
Figure 3- 18 3.4 Playback Playback function is to play video stored on device according to inputted time by user. Playback interface supports max of four windows and play mode: quick(x 4), slow(x 1/4) and by frame. The progress bar is specifically designed for small and touch screen use of smart phone. See Figure 3- 19.
Figure 3- 19 3.4.
Video control panel buttons in Figure 3- 20 are (from left to right): previous, next, pause/play, by frame, quick play, slow play. Previous and next is based on time mode set in smart phone. For example. In 60 min mode, previous means to play video taken one hour ago. Available modes are: 5min, 30min, 60min. Quick mode supports max 4x speed while slow mode supports min 1/4 speed. 3.
time monitoring and image playback. This function allows user to manage and control monitoring status of house, workplace and etc. It represent a remarkable innovation in surveillance industry. 3.6.
Figure 3- 24 In function interface touch Push Config to enter device list of push config. See Figure 3-22 and Figure 3-23. Touch icon of device to config, and when device connection succeeds, you will see Figure 3- 24. Push types have: motion detect, camera masking, local and disk alarm. If you select these alarm types, then you will receive corresponding alarm info on your smart phone. 3.6.
Figure 3- 25 iPhone must enable iDMSS Plus notification function in setup-notification interface. See Figure 326 and Figure 3- 27.
Figure 3- 26 Figure 3- 27 22
3.6.3 Receive Alarm Push After smart phone receives alarm push, it will generate a sound and display this info in top bar. User can open the push info here and view the playback or real time monitoring of alarm channel. See Figure 3- 28. Figure 3- 28 Meantime the push info will be stored in event list of the smart phone monitor software. You can open event list to view up to 50 records of past push info. See Figure 3-29, Figure 3-30 and Figure 3- 31.
Figure 3- 29 Figure 3- 30 24
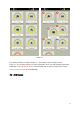
Figure 3- 31 According to push info, the opened video can be switched among live preview, playback and image playback. 3.7 E-Map E-Map is to load a diagram of a certain area into smart phone and then you can add channels onto the diagram as a map of added channels. For example in Figure 3- 32, there is a diagram of a house. Cameras are added to bedrooms with symbol displayed in diagram which allows users to clearly see the location of cameras. Touch the E-Map to open corresponding video.
Figure 3- 32 26
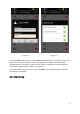
3.8 Channel Config Smart phone monitor software can config A/V enable, resolution, frame rate, bit rate control and bit rate speed of extra stream. This function allows user to directly control device from smart phone without PC or device config interface. See Figure 3- 33.
28
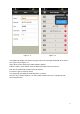
Figure 3- 33 3.9 Local Config Local config allows you to config local functions of smart phone monitor software, including PTZ, snapshot, push playback, password protection, and certificate update. See Figure 3- 34.
Figure 3- 34 3.9.1 Local Config Function Description 1. PTZ Here you can set step length of PTZ, and it ranges from 1 to 8. 2. Snapshot Here you can config quantity of snapshot and set 1/3/5 continuous snapshot. 3. Push Here you can set playback length of push info. There are 15s, 30s, 1min, 2min and 5min modes. 4. Certificate Here you can update the certificate in case you cannot log in device due to piracy. 5. Password Protection Here you can set password for the smart phone monitor software.
4 Compatible Smart Phone Android Android 2.2 and higher To use the push function, you need to create Google account first. iphone IOS 4.3 and higher Note: This user’s manual is for reference only. Slight difference may be found in user interface. All the designs and software here are subject to change without prior written notice. All trademarks and registered trademarks mentioned are the properties of their respective owners.