
Instruction Manual


62
In X346H346H346HFigure 4-39, input mode value in the No. blank, and click pattern button.
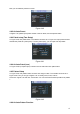
4.9.7 Auto Scan Setup
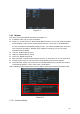
In X347H347H347HFigure 4-38, click border button. The interface is shown as in X348H348H348HFigure 4-43.
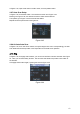
Please go to
X349H349H349HFigure 4-35, use direction arrows to select camera left limit
Then please go to
X350H350H350HFigure 4-43X and click left limit button
Repeat the above procedures to set right limit.
Figure 4-43
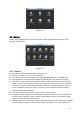
4.9.8 Activate Auto Scan
In X351H351H351HFigure 4-39, click “Auto Scan” button, the system begins auto scan. Correspondingly, the auto
scan button becomes Stop button. Click stop button to terminate scan operation.
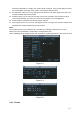
4.10 Flip
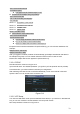
In X352H352H352HFigure 4-39, click page switch button, you can see an interface is shown as below. See Figure
44
X353H353H353H. Here you can set auxiliary function. The aux value has relation ship with the Aux button of
the decoder.
Click page switch button again, system goes back to
X354H354H354HFigure 4-32X.
Figure 4-44