
Quick Start Guide

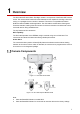
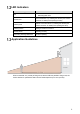
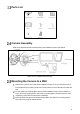
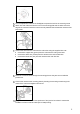


Table Of Contents

3
2 Installing the Camera
The camera ships with all the components to mount the camera to a wall. Before installing the
camera consider the following:
Review the “Installation Tips” section to help you choose an ideal mounting location.
Decide whether to run the cables through the wall or along the wall.
Installation Tips
To ensure the best possible wireless performance, it is recommended to keep the following
installation tips in mind when choosing a location for the camera:
Place the camera as close to your Wi-Fi router or access point as possible.
Reduce the number of obstructive materials between the camera and the router or access
point. Concrete, brick, metal and wood are the most common materials in your house that
can cause poor signal strength.
The camera uses the 2.4 GHz band exclusively. Most new routers support both 2.4 GHz
and 5GHz bands. It is recommended to use other WiFi devices on the 5 GHz band when
possible to ensure the 2.4 GHz band is not overcrowded.
Other electronic devices such as microwaves, TVs, cordless phones, and baby monitors
can cause signal interference. It is recommended to install the camera as far away from
these devices as possible.
Point the camera where there is the least amount of obstructions, for example trees and
branches.
Install the camera where vandals cannot easily reach.
This camera is rated for outdoor use. Installation in a sheltered location is recommended.
Unpacking
This equipment should be unpacked and handled with care. If an item appears to have
sustained damage during shipping, notify the shipper immediately.
Verify that all the parts listed below are included. If an item is missing, contact customer
support or your local representative.
The original packing carton is the safest container to transport the unit, in the event the unit
must be returned for service. Retain the carton and all shipping material for future use.