User's Manual
Table Of Contents
- Cybersecurity Recommendations
- Regulatory Information
- Foreword
- 1 Product Introduction
- 2 Basic Settings
- 3 Daily Operation
- 3.1 Live
- 3.2 PTZ
- 3.2.1 Bullet Camera
- 3.2.2 Dome Camera
- 3.2.2.1 Configuring Protocol
- 3.2.2.2 Configuring PTZ Functions
- 3.2.2.2.1 Configuring Preset
- 3.2.2.2.2 Configuring Tour
- 3.2.2.2.3 Configuring Scan
- 3.2.2.2.4 Configuring Pattern
- 3.2.2.2.5 Configuring Pan
- 3.2.2.2.6 Configuring PTZ Speed
- 3.2.2.2.7 Configuring Idle Motion
- 3.2.2.2.8 Configuring Power Up
- 3.2.2.2.9 Configuring Time Task
- 3.2.2.2.10 Restarting PTZ Manually
- 3.2.2.2.11 Restoring PTZ to the Default Settings
- 3.2.2.3 Operating PTZ
- 3.2.2.4 Configuring Preset Backup
- 3.3 Playback
- 3.4 Reports
- 3.5 Alarm
- 4 Setting
- 4.1 Configuring Camera
- 4.1.1 Configuring Lens
- 4.1.2 Configuring Video Parameters
- 4.1.3 Configuring Audio Parameters
- 4.2 Configuring Network
- 4.3 Peripheral
- 4.4 Smart Thermal
- 4.5 Event
- 4.6 Temperature Measuring Settings
- 4.7 Storage Management
- 4.8 System Management
- 4.1 Configuring Camera
- 5 System Maintenance
- 6 Additional Accessing Methods

Setting 88
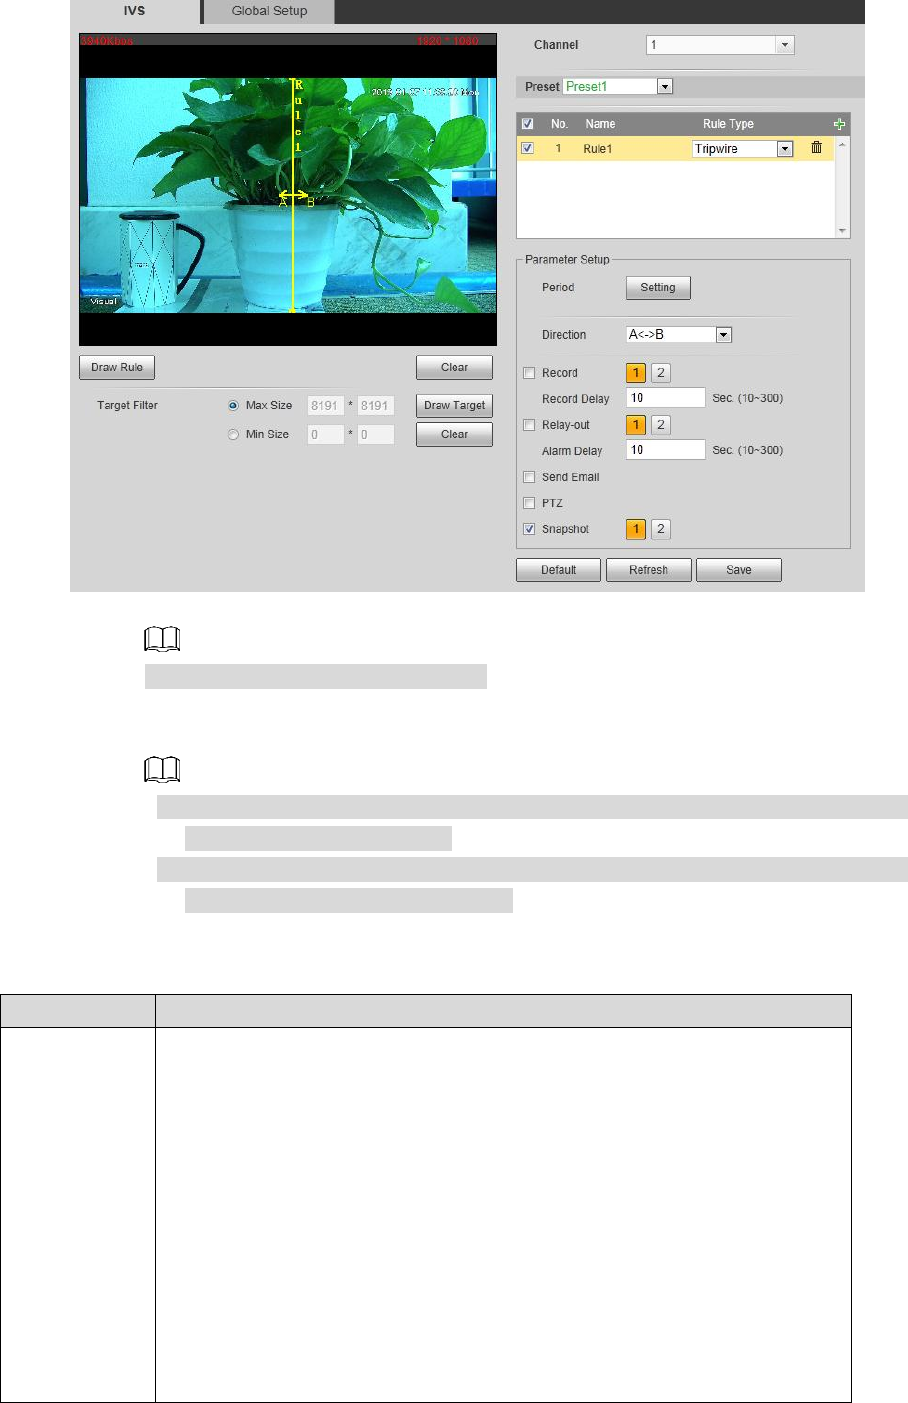
Tripwire Figure 4-43
2) Click Draw Rule to draw a rule on surveillance image. Right-click to end drawing.
Click Clear to delete all the tripwires.
3) Select Maximum Size or Minimum Size and click Draw Target. Then you can
drag the filter box’s corner to make the box larger or smaller.
An alarm is triggered only when size of the target that is crossing tripwire lies
between the two filter boxes.
When drawing a rule, you can select Maximum Size or Minimum Size and click
Clear to delete a relevant filter box.
4) Set up tripwire parameters. See Table 4-22 for details.
Table 4-22 Tripwire parameter description
Parameters
Description
Working
Period
Define a period during which the alarm settings are active.
1. Click Setting, and the period setting interface is displayed.
2. Configure period.
Method 1: Hold down and drag the left mouse button to select a
period you need.
Method 2: Select Setting > Event > Video Detection and click
Setting on the right side of Period. An interface is displayed. In
this interface, there are seven Settings altogether each of
which corresponds to a day in a week. Select a Setting you
want and there are six periods (period1-period6) below for you
to pick up.
1. Click Save to finish configuration of period.


