
User's Manual

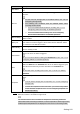
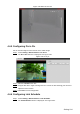
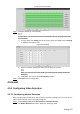


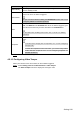


Table Of Contents
- Cybersecurity Recommendations
- Regulatory Information
- Foreword
- 1 Product Introduction
- 2 Basic Settings
- 3 Daily Operation
- 3.1 Live
- 3.2 PTZ
- 3.2.1 Bullet Camera
- 3.2.2 Dome Camera
- 3.2.2.1 Configuring Protocol
- 3.2.2.2 Configuring PTZ Functions
- 3.2.2.2.1 Configuring Preset
- 3.2.2.2.2 Configuring Tour
- 3.2.2.2.3 Configuring Scan
- 3.2.2.2.4 Configuring Pattern
- 3.2.2.2.5 Configuring Pan
- 3.2.2.2.6 Configuring PTZ Speed
- 3.2.2.2.7 Configuring Idle Motion
- 3.2.2.2.8 Configuring Power Up
- 3.2.2.2.9 Configuring Time Task
- 3.2.2.2.10 Restarting PTZ Manually
- 3.2.2.2.11 Restoring PTZ to the Default Settings
- 3.2.2.3 Operating PTZ
- 3.2.2.4 Configuring Preset Backup
- 3.3 Playback
- 3.4 Reports
- 3.5 Alarm
- 4 Setting
- 4.1 Configuring Camera
- 4.1.1 Configuring Lens
- 4.1.2 Configuring Video Parameters
- 4.1.3 Configuring Audio Parameters
- 4.2 Configuring Network
- 4.3 Peripheral
- 4.4 Smart Thermal
- 4.5 Event
- 4.6 Temperature Measuring Settings
- 4.7 Storage Management
- 4.8 System Management
- 4.1 Configuring Camera
- 5 System Maintenance
- 6 Additional Accessing Methods
Setting 107
2) Set area name and select motion detection areas as needed. You can configure
the sensitivity and mutation threshold. The threshold defines the allowed moving
area for certain objects. The motion detection will not be triggered as long as those
objects stay within the area.
The higher the sensitivity value is, the easier the motion detection will be
triggered; the lower the mutation threshold is, the smaller the allowed moving
area for certain objects is, hence the easier the motion detection will be
triggered.
Different colors represent different area. For each area, you can set different
sensitivity and mutation threshold.
In the wave diagram, red line represents motion detection is triggered, and
green line represents not.
3) Click Save to finish configuration.
Configure motion detection parameters. See Table 4-29 for details. Step 4
Table 4-29 Motion detection parameters
Parameter
Description
Period
Define a period during which the alarm settings are active.
1. Click Setting, and the period setting interface is displayed.
2. Configure period.
Method 1: Hold down and drag the left mouse button to select
working period you need.
Method 2: Select Setting > Event > Video Detection and click
Setting on the right side of Period. An interface is displayed. In
this interface, there are seven Settings altogether each of
which corresponds to a day in a week. Select a Setting you
want and there are six periods (period1-period6) below for you
to pick up.
3. Click Save to finish configuration of working period.
Anti-Dither
The system records only one motion detection event within the set time.
Record
Enable this function and alarm recording will be triggered when there is
an alarm.
To view and set storage path of recorded videos, see "4.1.2.5
Configuring Storage Path".
The following two conditions must be satisfied before alarm
recording function works:
You have enabled motion detection recording. See "4.7.1.1
Configuring Video Recording" for detailed operations.
You have enabled auto recording. See "4.7.3 Configuring
Record Control Parameters" for detailed operations.
Record Delay
Set a length of time for the Device to delay turning off recording after an
alarm is ended.
Relay-out
You can connect this relay-out port to such alarm devices as light and
siren. When an alarm is triggered, those alarm devices will work. Select
the check box to enable this function.