
User's Manual
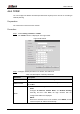

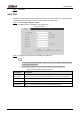


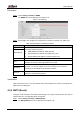


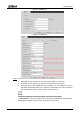
Table Of Contents
- Foreword
- Important Safeguards and Warnings
- 1 Overview
- 2 Configuration Flow
- 3 Device Initialization
- 4 Basic Configuration
- 4.1 Login
- 4.2 Live
- 4.3 PTZ Operation
- 4.4 Playback
- 4.5 Camera
- 4.5.1 Conditions
- 4.5.2 Setting Video Parameters
- 4.5.2.1 Video
- 4.5.2.2 Snapshot
- 4.5.2.3 Overlay
- 4.5.2.3.1 Configuring Privacy Masking
- 4.5.2.3.2 Configuring Channel Title
- 4.5.2.3.3 Configuring Time Title
- 4.5.2.3.4 Configure Text Overlay
- 4.5.2.3.5 Configure Font Attribute
- 4.5.2.3.6 Configure Picture Overlay
- 4.5.2.3.7 Configure Custom Overlay
- 4.5.2.3.8 Configuring OSD Info
- 4.5.2.3.9 Configuring Counting
- 4.5.2.3.10 Configuring Structured Statistics
- 4.5.2.3.11 Configuring Ranging
- 4.5.2.3.12 Configuring ANPR
- 4.5.2.3.13 Configuring Face Statistics
- 4.5.2.4 ROI
- 4.5.2.5 Path
- 4.5.3 Audio
- 4.6 Network
- 4.7 Storage
- 4.8 System
- 5 Event
- 5.1 Setting Alarm Linkage
- 5.2 Setting Smart Track
- 5.3 Setting Panoramic Calibration
- 5.4 Setting Video Detection
- 5.5 Setting Smart Motion Detection
- 5.6 Setting Audio Detection
- 5.7 Setting Smart Plan
- 5.8 Setting IVS
- 5.9 Setting Crowd Map
- 5.10 Setting Face Recognition
- 5.11 Setting Face Detection
- 5.12 Setting People Counting
- 5.13 Setting Heat Map
- 5.14 Setting Stereo Analysis
- 5.15 Setting ANPR
- 5.16 Setting Video Structuralization
- 5.17 Setting Relay-in
- 5.18 Setting Abnormality
- 6 Maintenance
- Appendix 1 Cybersecurity Recommendations

User’s Manual
81
Procedure
Step 1 Select Setting > Network > UPnP.
The UPnP interface is displayed. See Figure 4-73.
UPnP Figure 4-73
Select the Enable check box, and there are two mapping modes: Custom and Default. Step 2
Select Custom, click and then you can modify external port as needed.
Select Default, and then the system finishes mapping with unoccupied port
automatically, and you cannot modify mapping relation.
Click Save. Step 3
Open web browser on PC, enter http:// wide area IP address: external port number, and
then you can visit the local area device with corresponding port.
4.6.7 SNMP
SNMP (Simple Network Management Protocol), which can be used to enable software such as
MIB Builder and MG-SOFT MIB Browser to connect to the camera and manage and monitor
the camera.
Preparation
Install SNMP monitoring and managing tools such as MIB Builder and MG-SOFT MIB
Browser.
Get the MIB file of the matched version from technical support.
Procedure
Step 1 Select Setting > Network > SNMP.
The SNMP interface is displayed. See Figure 4-74 and Figure 4-75.