
User's Manual
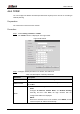

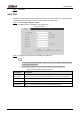


Table Of Contents
- Foreword
- Important Safeguards and Warnings
- 1 Overview
- 2 Configuration Flow
- 3 Device Initialization
- 4 Basic Configuration
- 4.1 Login
- 4.2 Live
- 4.3 PTZ Operation
- 4.4 Playback
- 4.5 Camera
- 4.5.1 Conditions
- 4.5.2 Setting Video Parameters
- 4.5.2.1 Video
- 4.5.2.2 Snapshot
- 4.5.2.3 Overlay
- 4.5.2.3.1 Configuring Privacy Masking
- 4.5.2.3.2 Configuring Channel Title
- 4.5.2.3.3 Configuring Time Title
- 4.5.2.3.4 Configure Text Overlay
- 4.5.2.3.5 Configure Font Attribute
- 4.5.2.3.6 Configure Picture Overlay
- 4.5.2.3.7 Configure Custom Overlay
- 4.5.2.3.8 Configuring OSD Info
- 4.5.2.3.9 Configuring Counting
- 4.5.2.3.10 Configuring Structured Statistics
- 4.5.2.3.11 Configuring Ranging
- 4.5.2.3.12 Configuring ANPR
- 4.5.2.3.13 Configuring Face Statistics
- 4.5.2.4 ROI
- 4.5.2.5 Path
- 4.5.3 Audio
- 4.6 Network
- 4.7 Storage
- 4.8 System
- 5 Event
- 5.1 Setting Alarm Linkage
- 5.2 Setting Smart Track
- 5.3 Setting Panoramic Calibration
- 5.4 Setting Video Detection
- 5.5 Setting Smart Motion Detection
- 5.6 Setting Audio Detection
- 5.7 Setting Smart Plan
- 5.8 Setting IVS
- 5.9 Setting Crowd Map
- 5.10 Setting Face Recognition
- 5.11 Setting Face Detection
- 5.12 Setting People Counting
- 5.13 Setting Heat Map
- 5.14 Setting Stereo Analysis
- 5.15 Setting ANPR
- 5.16 Setting Video Structuralization
- 5.17 Setting Relay-in
- 5.18 Setting Abnormality
- 6 Maintenance
- Appendix 1 Cybersecurity Recommendations

User’s Manual
77
Disable UPnP while using PPPoE to avoid possible influence.
After making PPPoE connection, the device IP address cannot be modified through web
interface.
Preparation
The camera has connected to the network.
You have gotten the account and password from Internet Service Provider.
Procedure
Step 1 Select Setting > Network > PPPoE.
The PPPoE interface is displayed. See Figure 4-70.
PPPoE Figure 4-70
Select the Enable check box, and then enter user name and password. Step 2
Click Save. Step 3
The success prompt box is displayed, and then the real-time WAN IP address is
displayed. You can visit camera through the IP address.
4.6.4 DDNS
Properly configure DDNS, and then the domain name on the DNS server matches your IP
address and the matching relation refreshes in real time. You can always visit the camera with
the same domain name no matter how the IP address changes.
Third party server might collect your device information after DDNS is enabled.
Register and log in to the DDNS website, and then you can view the information of all the
connected devices in your account.
Preparation
Check the type of DNS server supported by the camera.