
User's Manual


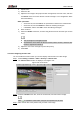

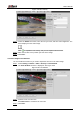
Table Of Contents
- Foreword
- Important Safeguards and Warnings
- 1 Overview
- 2 Configuration Flow
- 3 Device Initialization
- 4 Basic Configuration
- 4.1 Login
- 4.2 Live
- 4.3 PTZ Operation
- 4.4 Playback
- 4.5 Camera
- 4.5.1 Conditions
- 4.5.2 Setting Video Parameters
- 4.5.2.1 Video
- 4.5.2.2 Snapshot
- 4.5.2.3 Overlay
- 4.5.2.3.1 Configuring Privacy Masking
- 4.5.2.3.2 Configuring Channel Title
- 4.5.2.3.3 Configuring Time Title
- 4.5.2.3.4 Configure Text Overlay
- 4.5.2.3.5 Configure Font Attribute
- 4.5.2.3.6 Configure Picture Overlay
- 4.5.2.3.7 Configure Custom Overlay
- 4.5.2.3.8 Configuring OSD Info
- 4.5.2.3.9 Configuring Counting
- 4.5.2.3.10 Configuring Structured Statistics
- 4.5.2.3.11 Configuring Ranging
- 4.5.2.3.12 Configuring ANPR
- 4.5.2.3.13 Configuring Face Statistics
- 4.5.2.4 ROI
- 4.5.2.5 Path
- 4.5.3 Audio
- 4.6 Network
- 4.7 Storage
- 4.8 System
- 5 Event
- 5.1 Setting Alarm Linkage
- 5.2 Setting Smart Track
- 5.3 Setting Panoramic Calibration
- 5.4 Setting Video Detection
- 5.5 Setting Smart Motion Detection
- 5.6 Setting Audio Detection
- 5.7 Setting Smart Plan
- 5.8 Setting IVS
- 5.9 Setting Crowd Map
- 5.10 Setting Face Recognition
- 5.11 Setting Face Detection
- 5.12 Setting People Counting
- 5.13 Setting Heat Map
- 5.14 Setting Stereo Analysis
- 5.15 Setting ANPR
- 5.16 Setting Video Structuralization
- 5.17 Setting Relay-in
- 5.18 Setting Abnormality
- 6 Maintenance
- Appendix 1 Cybersecurity Recommendations

User’s Manual
54
Table 4-16 Description of fisheye parameters
Parameter
Description
Install Mode
You can select Ceiling, Wall, or Ground.
Record Mode
1O: The original image before correction.
1P: 360°rectangular panoramic image.
2P: When the install mode is Ceiling or Ground, you can set this
mode. Two associated 180° rectangular image screens, and at any
time, the two screens form a 360° panoramic image.
1R: Original image screen + independent sub-screen. You can zoom
or drag the image in all the screens.
2R: Original image screen + two independent sub-screens. You can
zoom or drag the image in all the screens.
4R: Original image screen + four independent sub-screens. You can
zoom or drag the image in all the screens.
1O + 3R: Original image screen + three independent sub-screens.
You can zoom or drag the image in original image screen, and move
the image (upper and lower) in sub-screens to adjust the vertical
view.
Click Save. Step 3
4.5.1.2 Profile Management
The surveillance system works in different ways as profile configured in different time.
Select Setting > Camera > Conditions > Profile Management. Step 1
The Profile Management interface is displayed.
Manage profile. Step 2
When Profile Management is set as General, the surveillance system works
under General configuration.
General Figure 4-43
When Profile Management is set as Full Time, you can select Day or Night in
the Always Enable list, the surveillance system works under Always Enable
configuration.