
User's Manual

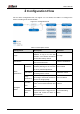
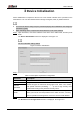
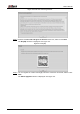
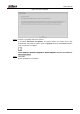

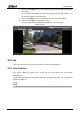
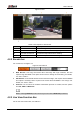
Table Of Contents
- Foreword
- Important Safeguards and Warnings
- 1 Overview
- 2 Configuration Flow
- 3 Device Initialization
- 4 Basic Configuration
- 4.1 Login
- 4.2 Live
- 4.3 PTZ Operation
- 4.4 Playback
- 4.5 Camera
- 4.5.1 Conditions
- 4.5.2 Setting Video Parameters
- 4.5.2.1 Video
- 4.5.2.2 Snapshot
- 4.5.2.3 Overlay
- 4.5.2.3.1 Configuring Privacy Masking
- 4.5.2.3.2 Configuring Channel Title
- 4.5.2.3.3 Configuring Time Title
- 4.5.2.3.4 Configure Text Overlay
- 4.5.2.3.5 Configure Font Attribute
- 4.5.2.3.6 Configure Picture Overlay
- 4.5.2.3.7 Configure Custom Overlay
- 4.5.2.3.8 Configuring OSD Info
- 4.5.2.3.9 Configuring Counting
- 4.5.2.3.10 Configuring Structured Statistics
- 4.5.2.3.11 Configuring Ranging
- 4.5.2.3.12 Configuring ANPR
- 4.5.2.3.13 Configuring Face Statistics
- 4.5.2.4 ROI
- 4.5.2.5 Path
- 4.5.3 Audio
- 4.6 Network
- 4.7 Storage
- 4.8 System
- 5 Event
- 5.1 Setting Alarm Linkage
- 5.2 Setting Smart Track
- 5.3 Setting Panoramic Calibration
- 5.4 Setting Video Detection
- 5.5 Setting Smart Motion Detection
- 5.6 Setting Audio Detection
- 5.7 Setting Smart Plan
- 5.8 Setting IVS
- 5.9 Setting Crowd Map
- 5.10 Setting Face Recognition
- 5.11 Setting Face Detection
- 5.12 Setting People Counting
- 5.13 Setting Heat Map
- 5.14 Setting Stereo Analysis
- 5.15 Setting ANPR
- 5.16 Setting Video Structuralization
- 5.17 Setting Relay-in
- 5.18 Setting Abnormality
- 6 Maintenance
- Appendix 1 Cybersecurity Recommendations

User’s Manual
9
4 Basic Configuration
The chapter introduces the basic configuration, including login, live view, PTZ operation,
playback operation, camera configuration, network configuration, storage configuration and
system configuration.
Login 4.1
This section introduces how to log in to and log out of the web interface. This section takes IE
Explorer 9 as an example.
You need to initialize the camera before logging in to the web interface. For details, see "3
Device Initialization."
When initializing the camera, keep the PC IP and device IP in the same network.
Follow the instruction to download and install the plug-in for the first login.
Open IE browser, enter the IP address of the camera (192.168.1.108 by default) in the Step 1
address bar and press Enter.
The login interface is displayed. See Figure 4-1.
Login Figure 4-1
Enter the username and password. Step 2
The username is admin by default.
Click Forget password?, and you can reset the password through the email address
that is set during the initialization. For details, see "6.3 Resetting Password."
Click Login. Step 3
The Live interface is displayed, see Figure 4-2.
Live: Click Live, and you can view the real-time monitoring image.
Playback: Click Playback, and you can play back or download recorded video or
image files.