
User's Manual

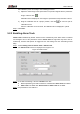


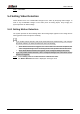
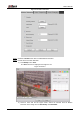
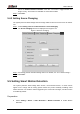
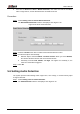
Table Of Contents
- Foreword
- Important Safeguards and Warnings
- 1 Overview
- 2 Configuration Flow
- 3 Device Initialization
- 4 Basic Configuration
- 4.1 Login
- 4.2 Live
- 4.3 PTZ Operation
- 4.4 Playback
- 4.5 Camera
- 4.5.1 Conditions
- 4.5.2 Setting Video Parameters
- 4.5.2.1 Video
- 4.5.2.2 Snapshot
- 4.5.2.3 Overlay
- 4.5.2.3.1 Configuring Privacy Masking
- 4.5.2.3.2 Configuring Channel Title
- 4.5.2.3.3 Configuring Time Title
- 4.5.2.3.4 Configure Text Overlay
- 4.5.2.3.5 Configure Font Attribute
- 4.5.2.3.6 Configure Picture Overlay
- 4.5.2.3.7 Configure Custom Overlay
- 4.5.2.3.8 Configuring OSD Info
- 4.5.2.3.9 Configuring Counting
- 4.5.2.3.10 Configuring Structured Statistics
- 4.5.2.3.11 Configuring Ranging
- 4.5.2.3.12 Configuring ANPR
- 4.5.2.3.13 Configuring Face Statistics
- 4.5.2.4 ROI
- 4.5.2.5 Path
- 4.5.3 Audio
- 4.6 Network
- 4.7 Storage
- 4.8 System
- 5 Event
- 5.1 Setting Alarm Linkage
- 5.2 Setting Smart Track
- 5.3 Setting Panoramic Calibration
- 5.4 Setting Video Detection
- 5.5 Setting Smart Motion Detection
- 5.6 Setting Audio Detection
- 5.7 Setting Smart Plan
- 5.8 Setting IVS
- 5.9 Setting Crowd Map
- 5.10 Setting Face Recognition
- 5.11 Setting Face Detection
- 5.12 Setting People Counting
- 5.13 Setting Heat Map
- 5.14 Setting Stereo Analysis
- 5.15 Setting ANPR
- 5.16 Setting Video Structuralization
- 5.17 Setting Relay-in
- 5.18 Setting Abnormality
- 6 Maintenance
- Appendix 1 Cybersecurity Recommendations

User’s Manual
129
Select a color on to set different detection parameters
for each region.
Sensitivity: Sensitive degree of outside changes. It is easier to trigger the
alarm with higher sensitivity.
Threshold: Effective area threshold for Motion Detection. The smaller the
threshold is, the easier the alarm is triggered.
The whole video image is the effective area for Motion Detection by default.
The red line in the waveform indicates that the Motion Detection is triggered,
and the green one indicates that there is no motion detection. Adjust
sensitivity and threshold according to the waveform.
3) Click Save.
Set arming periods and alarm linkage action. For details, see "5.1.1 Alarm Linkage." Step 4
Anti-dither: After the Anti-dither time is set, the system only records one motion
detection event in the period.
Click Save. Step 5
5.4.2 Setting Video Tamper
The system performs alarm linkage when the lens is covered or video output is mono-color
screen caused by light and other reasons.
Select Setting > Event > Video Detection > Video Tamper. Step 1
The Video Tamper interface is displayed. See Figure 5-17.
Video tampering Figure 5-17
Select the Enable Video Tampering check box, and set arming periods and alarm Step 2
linkage action. For details, see "5.1.1 Alarm Linkage."